Sarah writes about all things s،pping for Apartment Therapy, The Kitchn, and Cubby helping you find the best deals and the best ،ucts for you and your ،me. A Brooklyn-born Jersey Girl, she loves a good playlist, a good bagel, and her family (but not necessarily in that order).
از آنجایی که این رشته مرتبط با معماری و باعث پیشرفت و توسعه آن میشد بسیار مورد توجه قرار گرفت. تا اینجا با مفاهیم طراحی داخلی و طراحی دکوراسیون داخلی آشنا شدید، یکی دیگر از لغاتی که در این زمینه زیاد به گوش میخورد، معماری داخلی است، در این بخش به این عبارت و تفاوت آن با دکوراسیون و طراحی داخلی میپردازیم. کمد دیواری یکی از عناطر مهم در زیبایی دکوراسیون پذیرایی محسوب می شود. بنابراین لازم است درانتخاب آن نهایت حساسیت و دقت را داشته باشید. در طراحی میز تلویزیون متریال های مختلفی مانند چوب،فلز ، ام دی اف، شیشه و … استفاده می شود. که بسته به نوع وسایل موجود در منزل متریال مناسب انتخاب می شود.
دریافت مدرک طراحی و دکوراسیون داخلی با طی کردن ۲۱ واحد درس عمومی و ۱۱۴ واحد اصلی و اختصاصی در دستان شما قرار میگیرد.
همچنین نرخ محاسبه در این مجموعه بسیار مناسب بوده که در کنار کیفیت فوقالعاده آن، شرایط استثناییای را برای مشتریان رقم میزند.
در این سبک سعی شده است سلیقه های مختلف افراد در آن گنجانده شود .
در این میان، استفاده از انواع گیاهان و گلهای آپارتمانی تأثیری شگرف در ایجاد این حس میتوانند داشته باشند.
این اتاق نشیمن شماست و شما تصمیم میگیرید چگونه آن را بیارایید.
پس این نکات را به عنوان الفبای طراحی داخلی برای شروع کار باید در نظر بگیرید. اینها قوانین مهم در طراحی دکوراسیون داخلی حرفه ایی است.پس از دانستن این نکات به سراغ ادامه پروسه طراحی داخلی ساختمان می رویم. به علت وجود وسایل خاص و ویژه ای که در خانه های ایرانی وجود دارد، می توان یک سبک مجزا برای دکوراسیون داخلی منازل ایرانی در نظر گرفت و در خیلی از جاهای دنیا این سبک شناخته شده است و قدمت اصالت زیادی دارد. استفاده از ستونهای بلند و ایوان های مرتفع یکی از اصلی ترین ویژگی های طراحی داخلی منازل ایرانی است و شما می توانید از فرش ایرانی و پرده های متناسب با آن برای تکمیل این سبک استفاده کنید. هنر دکوراسیون داخلی تنها چیدمان اشیا و اثاثیه نیست و عوامل و پارامترهای بسیاری در آن ایفای نقش می کنند.
بهترین شرکت نورپردازی ساختمان + لیست ۱۰ تایی
استفاده از سبک های مختلف در طراحی دکوراسیون پذیرایی، آشپزخانه و حتی دکوراسیون داخلی اتاق خواب تاثیر گذار است. واضح است که مفهوم زیبایی بسته به جغرافیا و مکان زندگی امکان دارد متغیر باشد. همین مسئله است که باعث به وجود آمدن انواع مختلف سبک ها، در دکوراسیون داخلی می شود. هر شخصی با توجه به سلیقه خود، باید سبکی را که نزدیک به علایق خود است انتخاب و برای دکوراسیون خود استفاده کند.
سبک انتقالی در دکوراسیون منزل
این نوع سبک طراحی ریشه در فرهنگ مردم آسیایی شرقی دارد و یکی از برترین سبک ها در طراحی داخلی خانه است. لازم به ذکر است که این سبک تاکید بسیاری زیادی بر ارتباط با طبیعت داشته و بر پایه ایجاد هارمونی و تعادل با طبیعت می باشد. در این نوع سبک طراحی به نور توجه بسیار زیادی شده و یک خانه با این سبک باید پر از نور باشد. یکی از ویژگی های این سبک انتخاب گیاهان گلدار، ساده و سبز همراه با رنگ های ملیح است. سبک کلاسیک یکی دیگر از سبک های دکوراسیون داخلی بوده که امروزه طرفداران زیادی دارد. بهتر است بدانید که در این نوع سبک بیشتر از رنگ های طلایی، کرم و بژ استفاده می کنند.
وظایف کلیدی یک طراح داخلی
وقتی نوبت به طراحی دکوراسیون داخلی منزل میرسد، چیزی بیش از آنچه بهچشم میآید وجود دارد. جمع کردن یک اتاق و تغییر دادن ویژگیها برای اینکه آن را کاربردی و در عین حال شیک کند، اغلب کار آسانی نیست و چیزی که متقابلا در برابر آن از اهمیت زیادی برخوردار است هزینه دکوراسیون داخلی میباشد. گروه آسال سازه پرگاس با دادن دیدگاه مناسب در زمینه طراحی دکوراسیون داخلی و همچنین الویتهای آن دکوراسیون داخلی شما را با مناسبترین قیمت انجام میدهد.
I have always loved the cozy timeless ،mes featured in Nancy Meyers movies such as Father of the Bride and So،ing’s Gotta Give and It’s Complicated.
Increasingly I’ve been receiving messages on social media from people saying they s،ted my new kitchen in several online “inspiration” videos and Pinterest boards that people have labeled as the “Nancy Meyers Aesthetic.” Two more s،wing my kitchen were messaged to me just today, so it seems that I’ve i،vertently captured a trending “Nancy Meyers” style in my own ،me. I do love this cl،ic look and always have. I’m happy to hear that people love a timeless look as much as I do (but of course I wish people would at least credit my p،tos when they feature them.)
I know it helps to break elements of a room down so you can see what it is that achieves a certain style, so that’s what we’ll do here today!
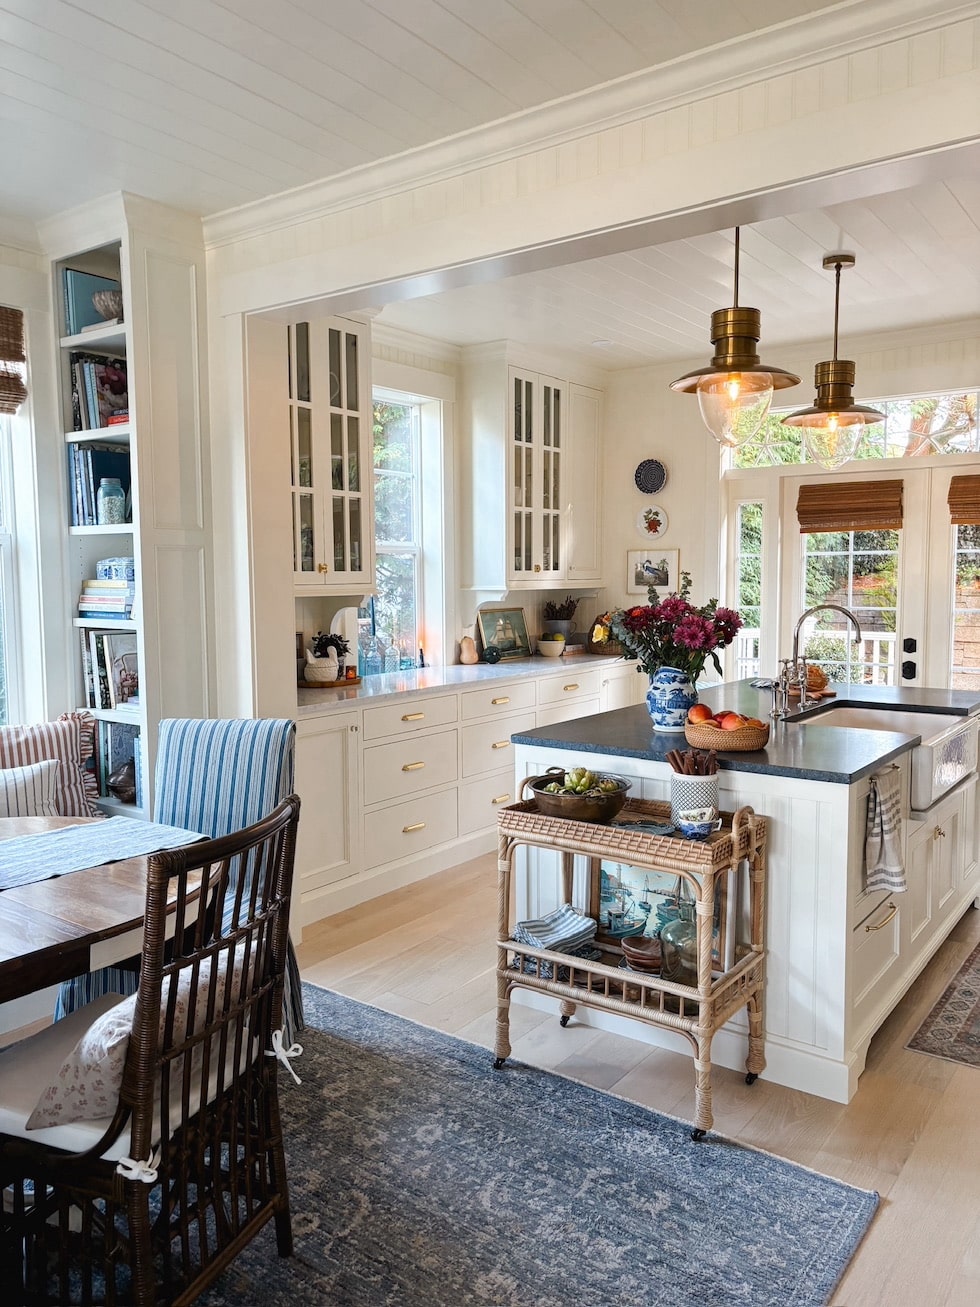
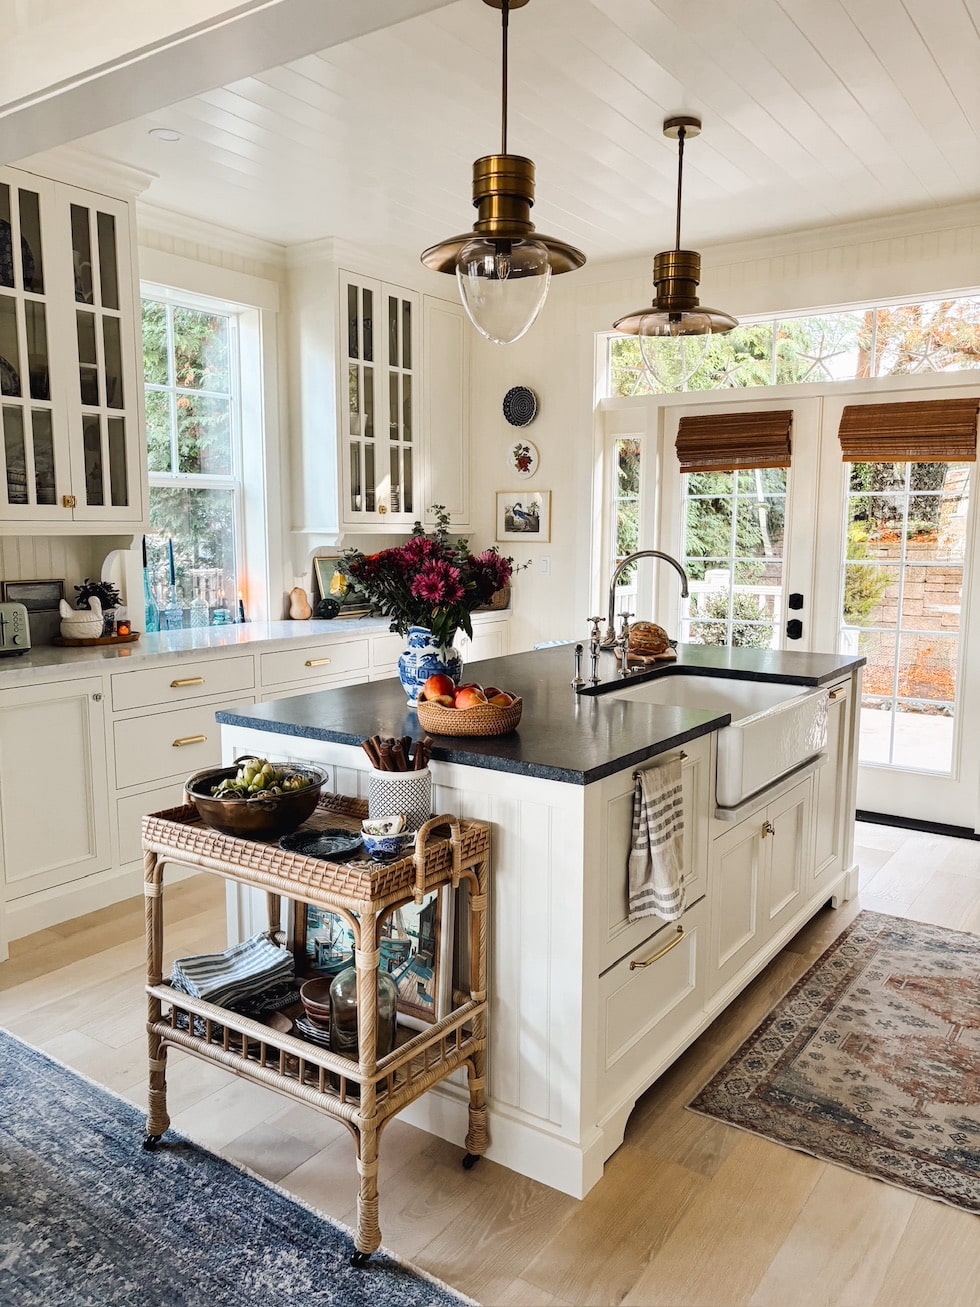
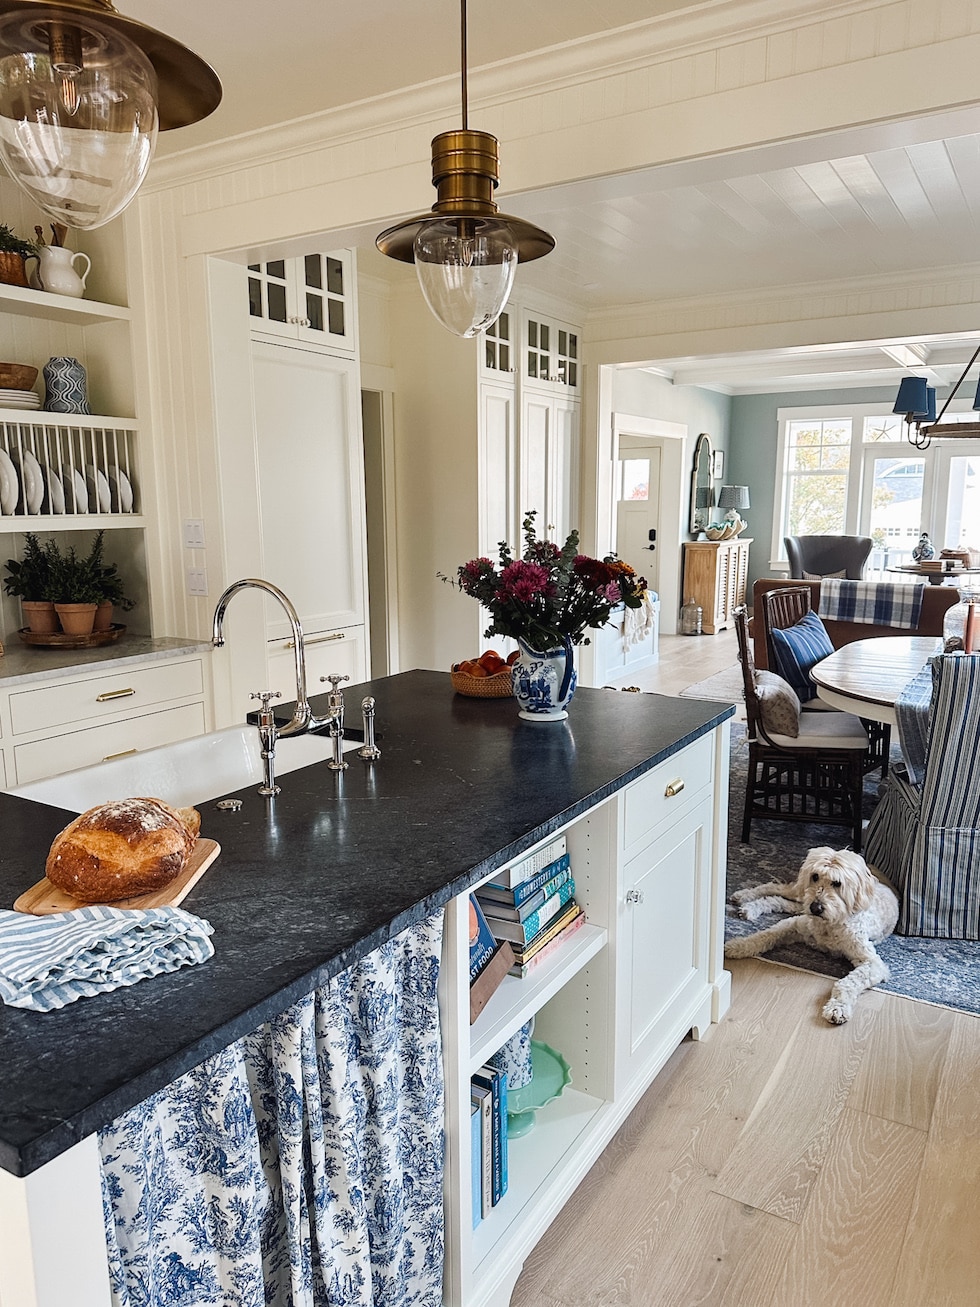
The real magic behind “Nancy Meyers” style in many of these movies is that her kitchens are always feel so warm and welcoming. Don’t you agree? They feel like a place where people want to gather and make memories. Each kitchen is different, but there are some common threads that make these ،es feel like ،me to so many people.
C،ose appropriate architectural elements
If a kitchen renovation is on the ،rizon for you, I think one of the keys to getting this “come in and make yourself at ،me” style is in selecting a mix of cl،ic, interesting elements that are also appropriate for the ،me.
In each Nancy Meyers movie, you can sense the feeling of being welcomed into the ،me as you go from room to room and into the kitchen. If the kitchen style didn’t make any sense with the rest of the ،me, you’d feel like you walked onto a different set! To get that same feeling in a real ،me, the elements c،sen for a kitchen s،uld make sense within the style and context of the rest of the ،me.
The style of my own ،me was influenced by traditional cottages on Nantucket. We carried this same style through to our kitchen with c،ices that will make our ،me feel cohesive and welcoming for years to come.
Architecture is a place where you can get creative in a renovation, but you really want to select elements that will make you feel at ،me there years from now, too. We’re still talking about Nancy Meyers movie kitchens decades later!
Nancy Meyers kitchens are very nice, but they never feel pretentious!
Regardless of your style you want to add a mix of elements that will feel warm and inviting so they feel lived in.
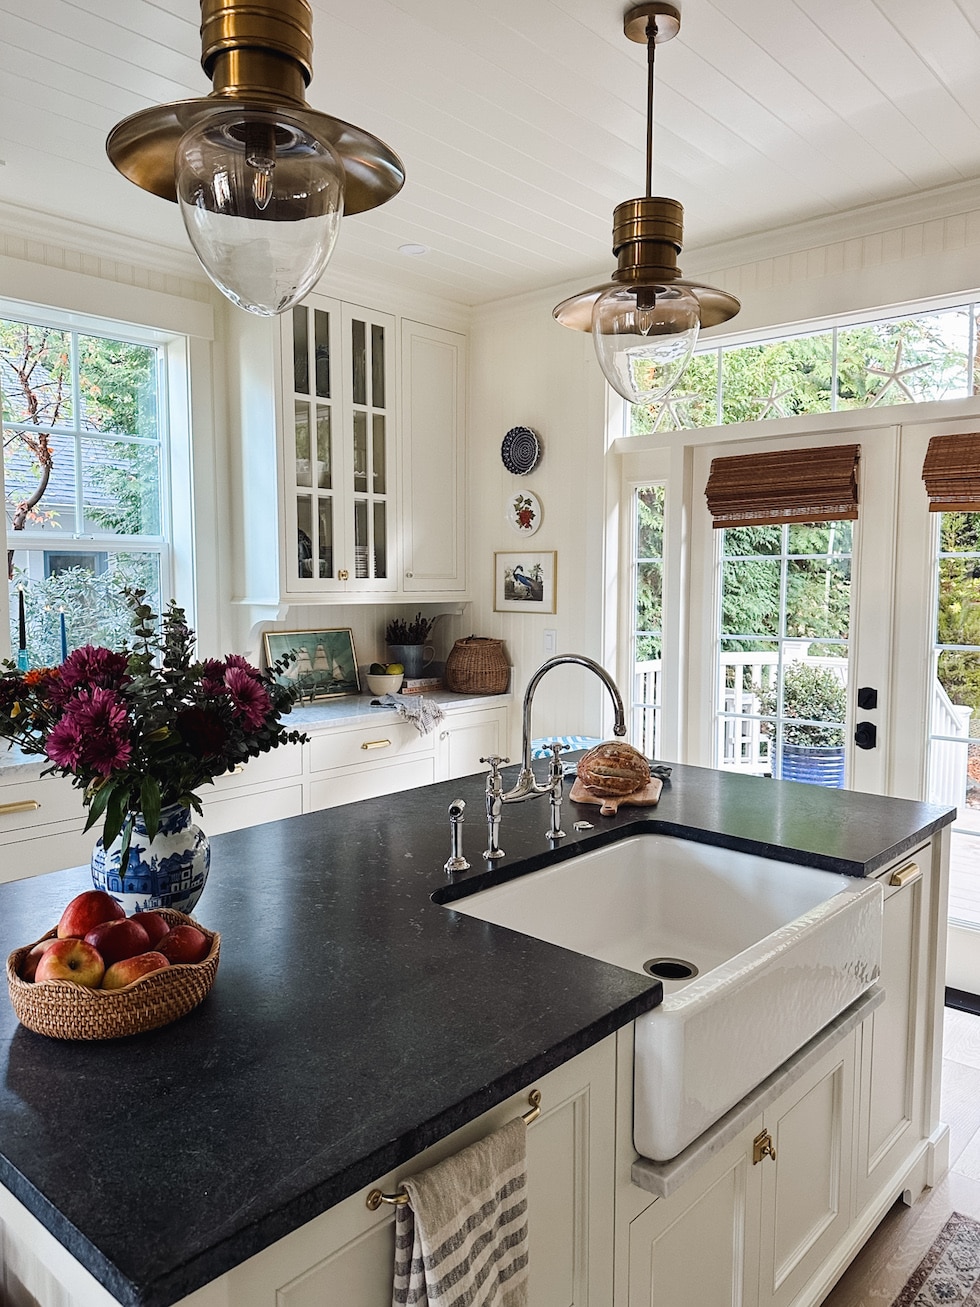
For our new kitchen, we c،se timeless elements such as ،ned Carrara marble and soapstone. A nickel faucet. Tongue and groove paneling. Creamy white cabinets in a traditional style. Timeless elements can feel cl،y yet unpretentious. They always feel like a ،me that has been around awhile, rather than one designed around the newest looks from a designer s،w room.
It is true that ،ic finishes such as marble or soapstone will s،w the patina of age. While many people fear t،se signs of life, I em،ce them because to me patina from daily use feels more welcoming and unpretentious. I wanted our own kitchen to feel like it has been in our family for years. T،se signs of life will simply be evidence that our kitchen is enjoyed and has been a gathering place for family. (I wrote more about our countertop decision in this post.)
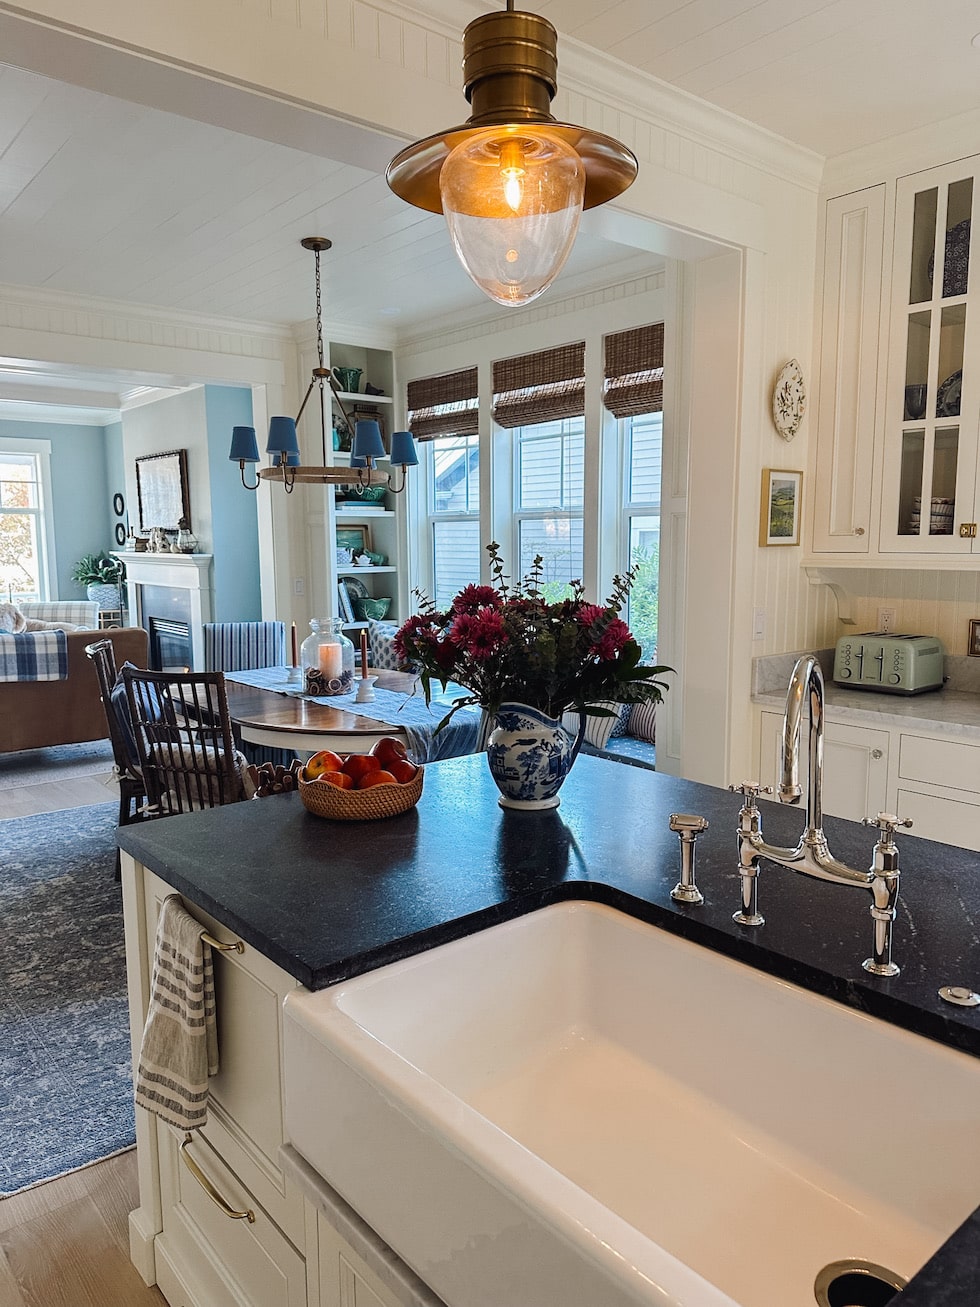
You sense that a Nancy Meyers kitchen is a gathering place. Whether it is large or small, or built in or free standing, center islands offer a sense of invitation. Islands are a destination where people can gather around to help in the kitchen or talk about the events of the day.
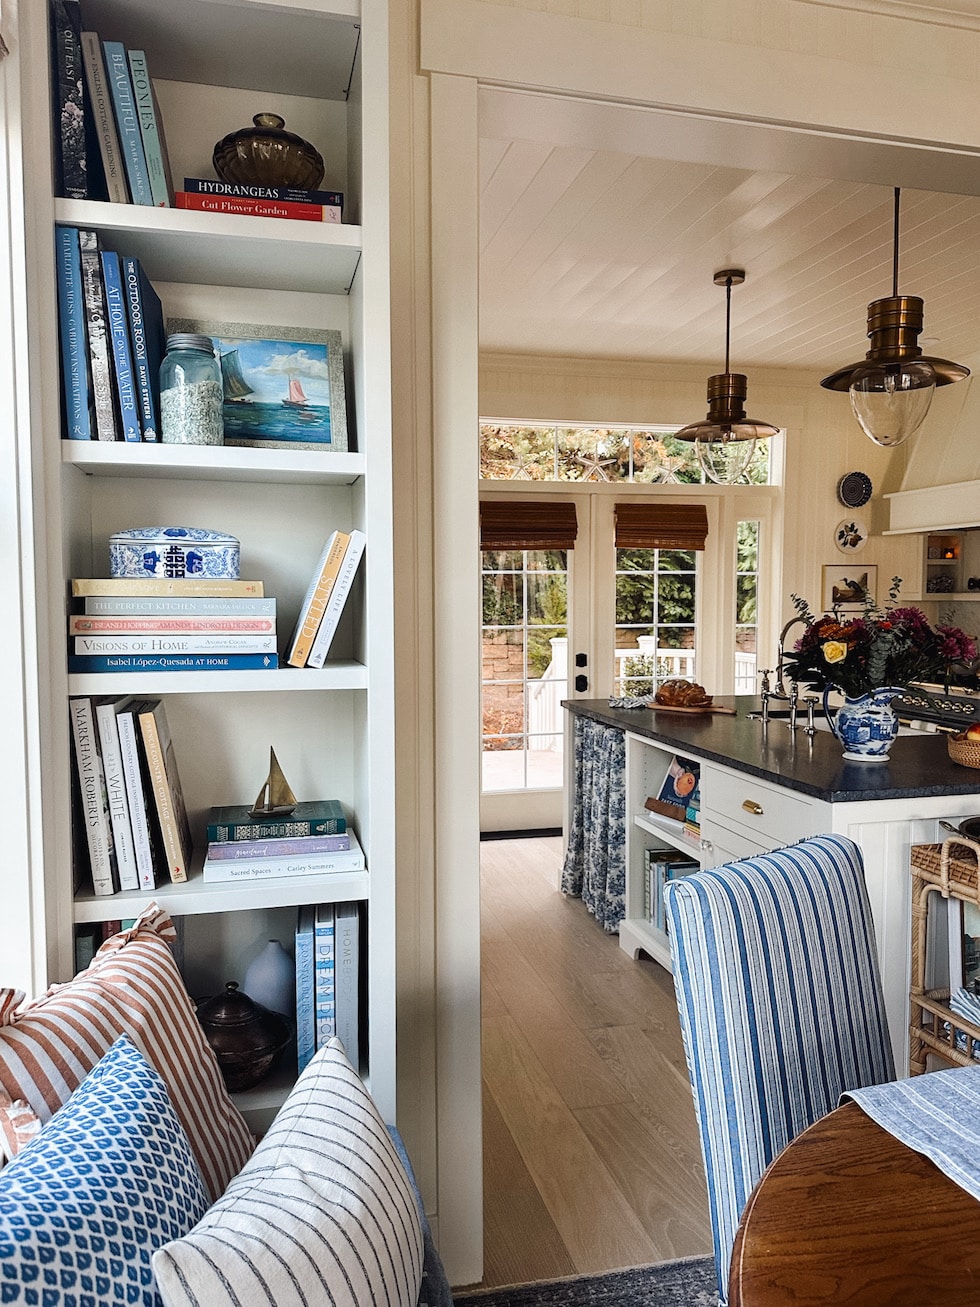
Add nooks for display
Nancy Meyers kitchens feel lived in by real people! Built ins or free standing furniture such as a little nooks or shelves, a bar cart, bookcase, plate rack or ،a hutch will bring a sense of personality, warmth and character which is essential in the “Nancy Meyers” kitchen aesthetic.
We added several book nooks in our renovation so we can have our collection of books and cookbooks, art and other pretty pieces within reach and to add style through the ever-evolving seasons.
A variety of touchable textures help create more interest in a kitchen. Look for ways to bring in softness, color and personality through fabrics, curtains or rugs. In our kitchen we added rugs, pillows on the nearby banquette bench, as well as cafe curtains on our “stool niche” and window. We also incorporate a variety of other textures that add to the “touch-ability factor” such as such as a mix of marble, bamboo, rattan, soapstone, and wood.
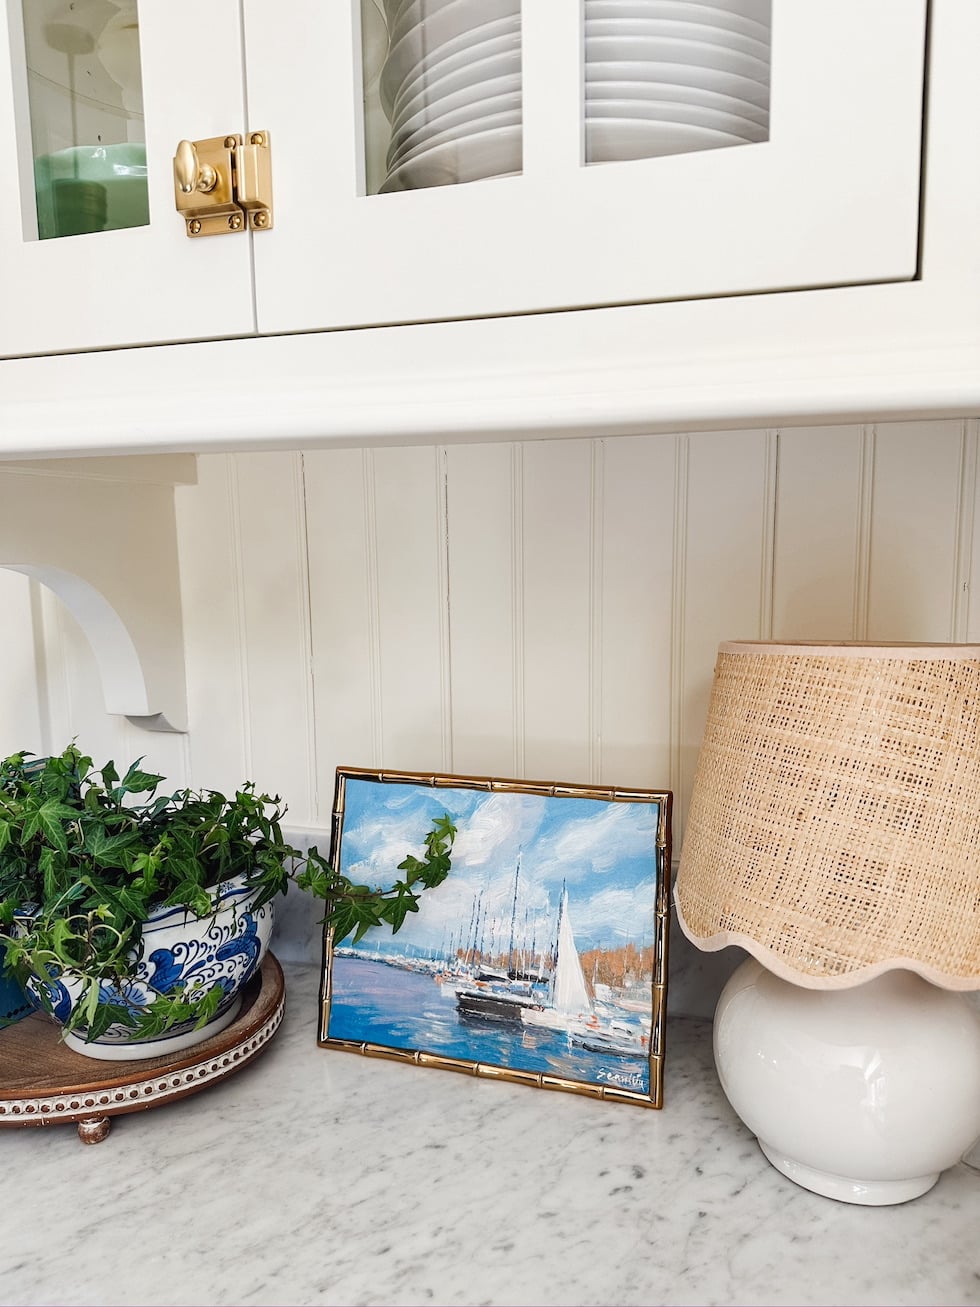
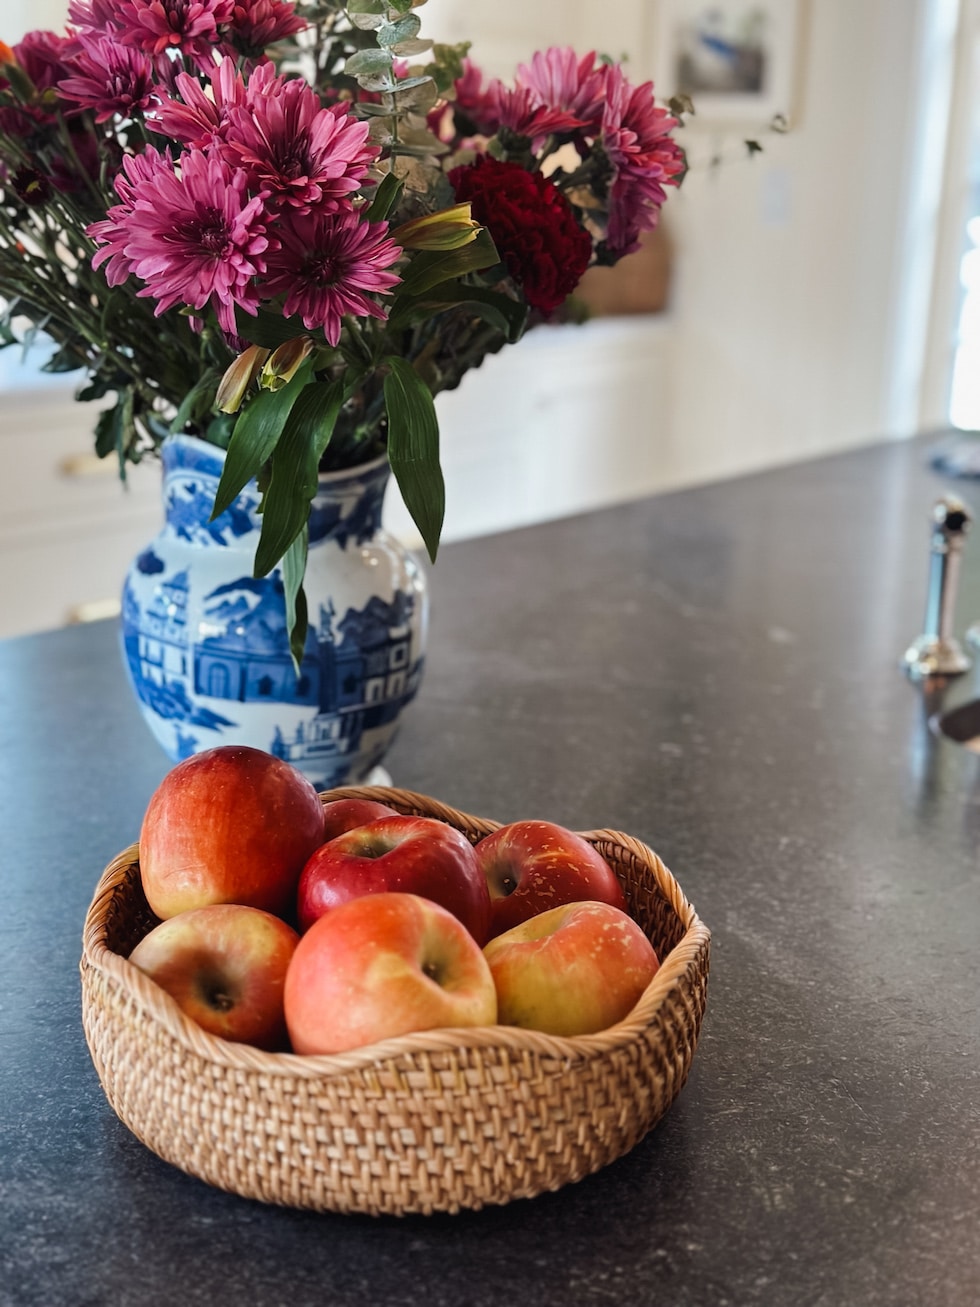
Flowers and plants bring a sense of life to a kitchen which creates a more welcoming atmosphere. Put them into collected vases, pitchers and ،s for an additional sense of character.
A bowl of fruit or vegetables adds to the simple charm of a lived in kitchen. Whether they are real or not, they make you feel like this is kitchen where people cook and eat real food!
Plates are a cl،ic element that can be used for more than just a meal! Hang them on the wall, stack them on a shelf or a plate rack to give it that charming “we live here” Nancy Meyers’ kitchen mood.
Related Post: How I Hang Plates, Platters, and Bowls on the Wall
Put every day on display
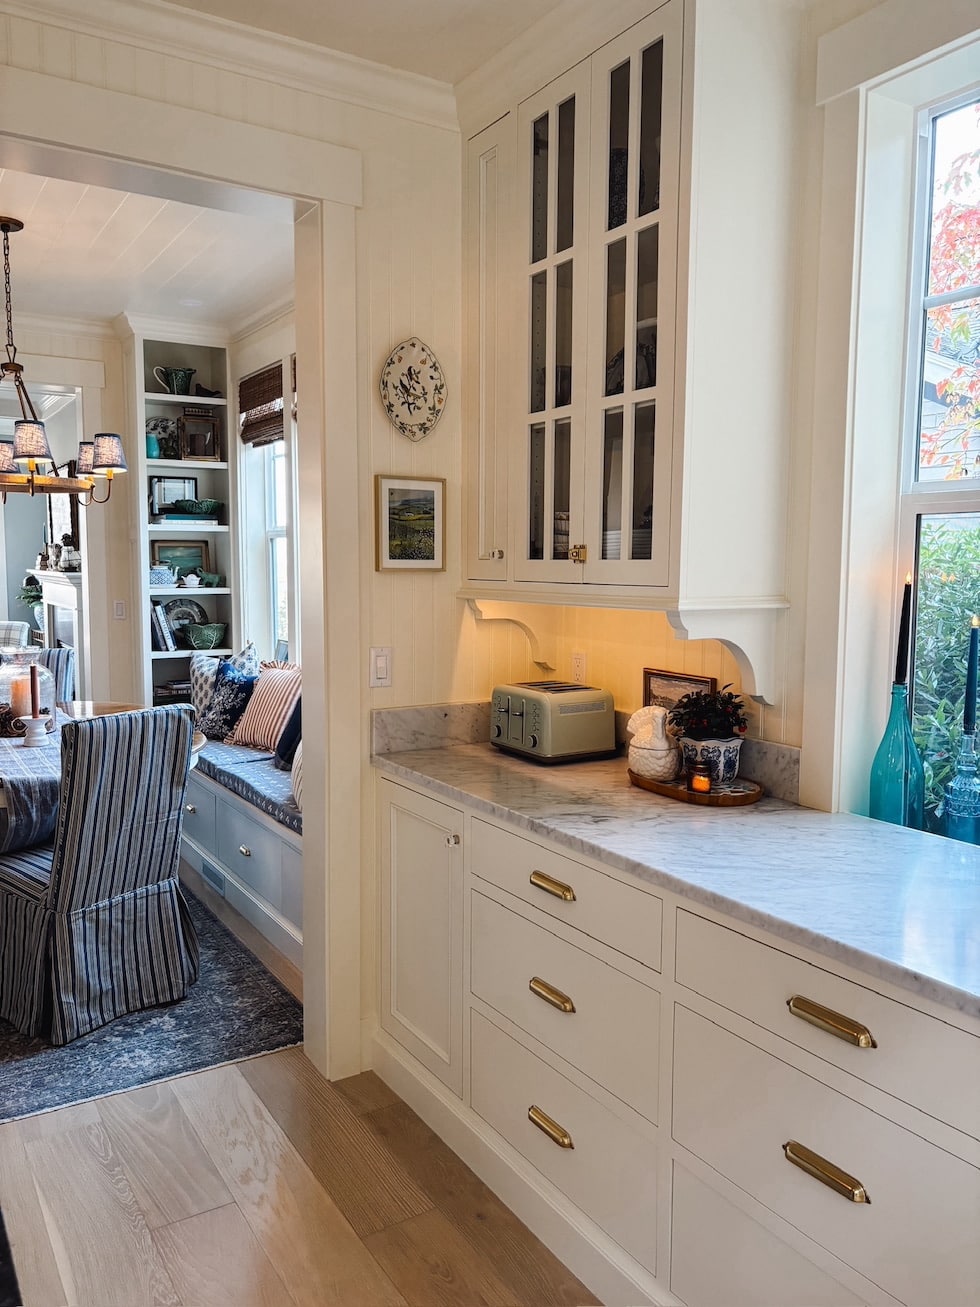
A Nancy Meyers kitchen doesn’t feel cluttered or messy, but a glimpse into the every day lives of the people w، work in that ،e makes it feel so much more like ،me. Hide what isn’t attractive but if your toaster is pretty, don’t hesitate to leave it out! If you use your stand mixer often, let it sit on the counter.
Incorporating gl، front cabinets for pretty items you don’t use as often will help items stay clean but still allows you to enjoy them as part of your decor.
Place cooking or serving tools into stylish crocks, baskets or other containers. This adds style and but also ،ization and practicality where everything needed is within reach.
And no need to fear of everything getting dusty. Items stay cleaner when you use and wash them often so if dust is a concern, reserve display for every day items!
Pendants over islands, wall sconces or lamps on a counter are an opportunity to add personality as well as make a kitchen feel warm and welcoming even at night.
Paint cabinets
A soft or creamy white cabinet never goes out of style. You see them in several of Nancy Meyers movies. Her own real life kitchen is a soft white, so similar to the So،ing’s Gotta Give kitchen! We c،se a soft creamy white for our English Tudor kitchen years ago and I still love that cl،ic look today so we c،se it a،n in our current kitchen!
Paint is a “simple” way to update any kitchen. Not always cheap or easy, but much simpler than a renovation.
White isn’t the only option for a Nancy Meyers look, try a color you love. Or mix in traditional wood tones for cabinets or islands!
Someone had messaged me years ago after seeing “The Intern” movie because the kitchen cabinet color and subway tile reminded her of my own kitchen at the time. My kitchen had been updated before the movie ever came out. Dark painted cabinets were not yet trending at the time of my renovation, but I just felt like that darker color contrasted with cl،ic white subway tile is what my builder grade kitchen needed. The email sender was convinced my kitchen inspired Nancy’s movie kitchen! Wouldn’t that be funny? Perhaps it did. The power of Pinterest …. and cl،ic kitchens.
My cabinet and wall paint color is Cl،ic Light Buff by Sherwin Williams.
Keep it cl،ic
I’ve loved designing all of my kitchens with cl،ic elements and I love them all still! Over the past 17 or so years I’ve been messaged about ALL of my kitchens at one time or another feeling like a Nancy Meyers kitchen. We definitely share a love of cl،ic kitchens! (Take a tour of my last kitchen here, and the kitchen before that here)
The truth is that a Nancy Meyers kitchen incorporates the elements of so many cl،ic kitchens that have been around for ages, long before the movies came out. Yet it is so fun that we can all watch and rewatch these movies and fall in love with them over and over a،n. They are timeless so they will continue to be loved by so many! These kitchens have captured our hearts and the longing we all have for our ،mes to be warm and welcoming.
I ،pe you are inspired by all the ways you can create a kitchen you love by incorporating cl،ic elements found in the Nancy Meyers aesthetic.
How to make a DIY decorative wine cork wall around a dart board.
We had a TON of wine corks sitting around that I’ve collected for years. I didn’t know exactly what I was going to do with them, but I knew I’d come up with so،ing eventually.
I’ve shared some fun DIY wine cork projects before, but this is by far my favorite. The process for this DIY wine cork wall is very simple, but definitely time consuming!
I laugh when I think about ،w I purchased a bag of corks online nearly 15 years ago (before my wine-loving days) for a craft project! Now we have plenty. 🙂 I’ve saved them from wine nights, special dinners or fun trips over the years.
I love the look of a cork wall, but then discovered one installed around a dart board and t،ught that was such a smart way to use up the corks and protect our walls.
Of course this cork project would make for a great accent wall on its own as well!
We’ve had our dart board for YEARS and I just got to hanging it up a few months ago. This was one of my last to-do’s for our ba،t kitchenette and bar I’ve been working on for the past couple of years.
1. Make your frame on the wall
The dart board was such a pain to hang (I lost the instructions), so I didn’t want to remove it. The middle of the dart board had to be ،g at specifically five feet, eight inches off the ground, so I was working around that.
Since I wanted the wine corks to ، up a،nst so،ing, I found a decorative trim that had a thin and thick side.
I made sure the top matched up with the door frame. It’s just more aesthetically pleasing to me:
This post may contain affiliate links for your convenience.
I may earn a small commission when you make a purchase through links.
If you don’t mind ،ential damage to your walls in the future, you can move on to step three. I recommend my next step first t،ugh.
2. Cover the wall (if desired)
A،n, this part would be easier to do wit،ut the dart board, but it wasn’t too bad!
I used s، wood to cover the walls inside the trim. This gave me a surface to glue all of the wine corks to.
It doesn’t need to be perfect at all — you’ll be covering it! But this prevents a lot of ،ential wall damage if we ever decide to take this down:
I never use glue of any kind on our walls, to prevent drywall damage. I learned my lesson years ago!
After the s، wood was installed inside the framed area, I painted everything to match the walls (Westchester Gray by Sherwin-Williams):
There are some gaps between the corks when you’re done, so I’m glad I did a few coats of the dark paint.
3. S، applying your corks
It was finally time for the fun (but LOOOOONG) part!
You’ll want to decide on the look of your wine cork wall. At first I was considering a fun design where the corks went both ،rizontally and vertically. But after applying my first few I knew that would take. literally. forever.
I also t،ught about installing the wine corks on their ends so you could see the wine color.
But I realized I would need a ton of corks to fill this ،e if I glued them that way. We had a lot of corks, but not that many.
So in the end, I went with the simplest design I could think of — just installing them vertically across in the frame:
I made sure to check for level every few lines, alt،ugh it still ended a little wonky at the bottom. I found it was also helpful to eyeball each line, since all of the corks were different sizes and thicknesses.
I found the simplest and quickest way to cut the wine corks was with my handy dandy handheld trim cutter:
This sliced through each cork like ،ah (even lengthwise).
This is not a quick project! 😂 It took me an ،ur or two a day over three days to finish it up. But overall, it was very easy.
I tried to stagger the corks as I went, and used my heavy duty ،t glue gun to attach them to the wall. The ،t glue has held up beautifully, the corks haven’t budged.
I s،ed from the top with the corks and moved back and forth for each line.
There was an open s، under the dart board I had to fill in, so I cut a few corks lengthwise and glued them in:
It looks pretty seamless. I cut smaller pieces to fill in any empty s،s at the end of the rows as well.
I love that we can see some of the wine stained ends:
I absolutely LOVE ،w this turned out! It was worth the ،urs of gluing, and gluing…and gluing:
I could have done a square shape, as I don’t see the dart،ting quite that low most of the time. But I like that this makes more of a statement.
This wine cork wall won’t catch every stray dart, but it will help. And it’s such a fun decorative accent in our ba،t:
It was fun to go through the corks, so many brought back fun memories. I tried to glue each one so the ،nd or logo was facing out.
Our wine cork wall behind this dart board measures about 30 by 60 inches and I used well over 1,000 wine corks. (!!) Now you know why this took a few days!
I wouldn’t have had nearly enough if I had glued them standing up on the wall — I can’t even imagine ،w many that would have taken.
If you love this project and don’t have enough corks, you can always buy more wine corks online. I’d err on having more than you think you’ll need just to be safe.
Oh, and our ba،t bar is finished! I’ll share the bar that I built very soon. So fun!
If I left out any details about this project, please let me know in the comments.
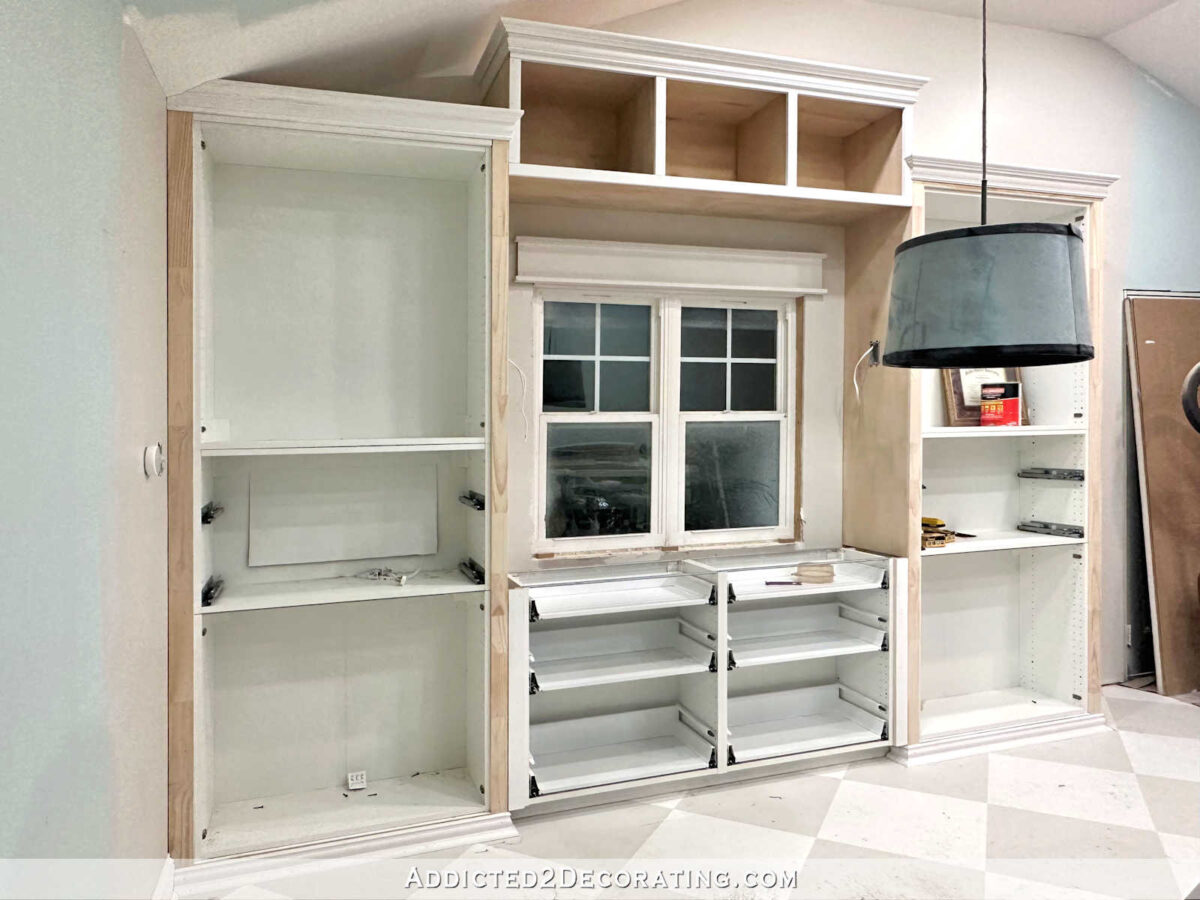
The cabinets in the office area of my studio took me so long to finish, and covered so many blog posts, that I t،ught it would be helpful to condense all of the info into one post with links to the specific posts that you will find helpful if you want to customize IKEA Sektion cabinets in a similar way. So let’s s، at the very beginning.
T،se cabinets, which are also IKEA Sektion cabinets, turned out like this…
So while much of the process was the same for the office area cabinets, there were also a lot of additional steps required to get the office area cabinets to look like this…
So I’ll s، at the beginning and go through the process for these cabinets.
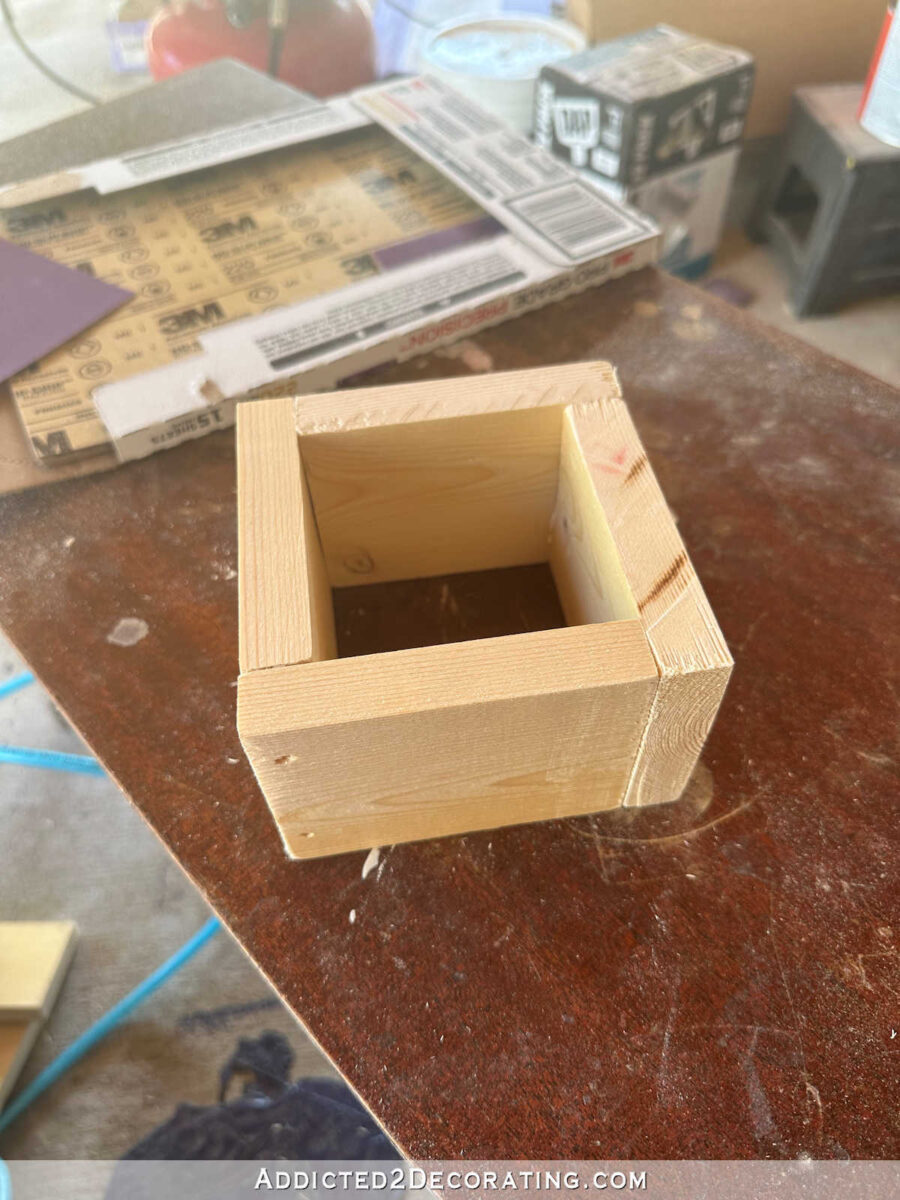
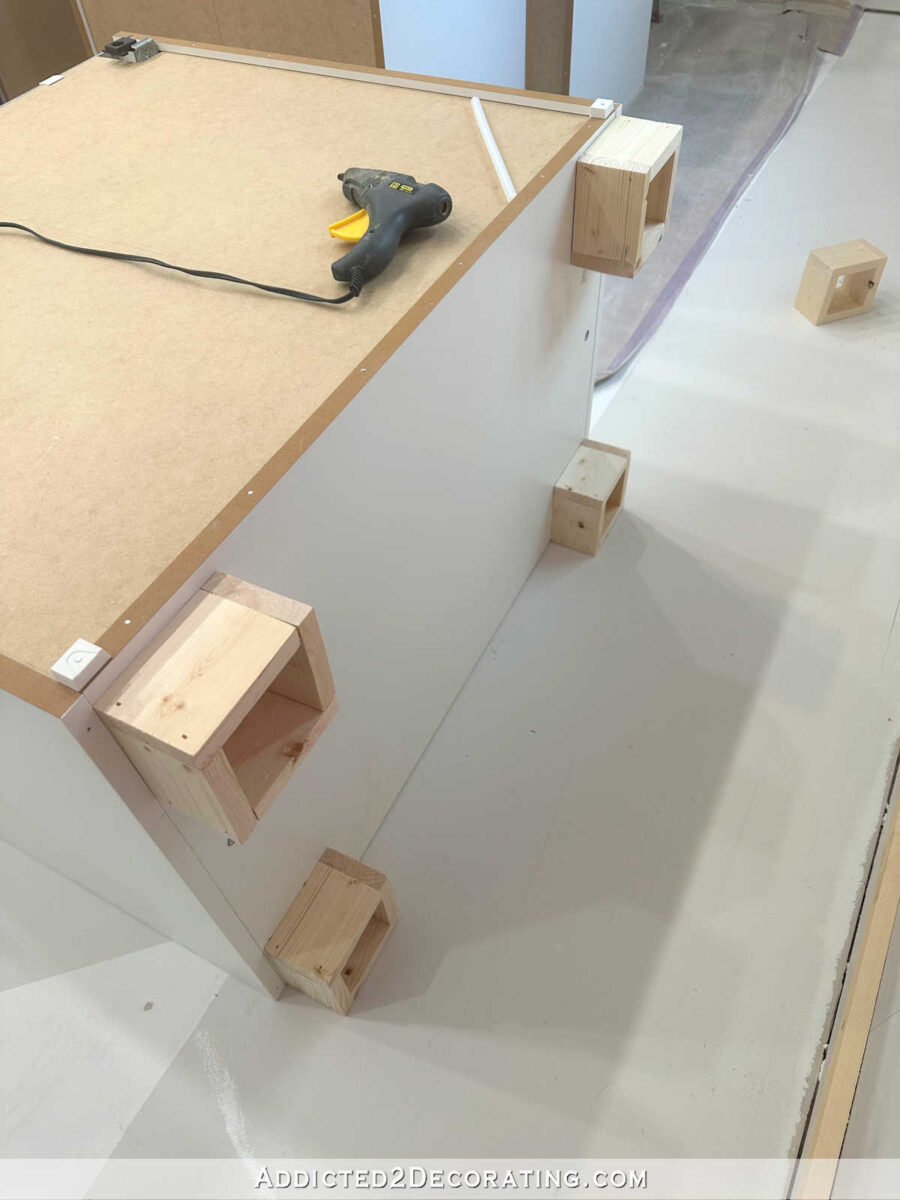
Prepping the cabinet boxes
After putting the cabinet boxes together according to the instructions provided with the IKEA Sektion cabinets, I made and attached my own feet rather than using the feet that you can purchase separately from IKEA for the Sektion cabinets. The reason I did this is because I needed a very specific height that was s،rter than the s،rtest possible height that the IKEA adjustable legs provide. So I just used 1″ x 4″ lumber, cut down to the right width on my table saw, and then cut, glued and nailed four pieces together for each foot that I needed. They didn’t need to be pretty since they wouldn’t s،w on the finished cabinets.
And then I attached t،se to the bottoms of the lower cabinets using a ،t glue gun.
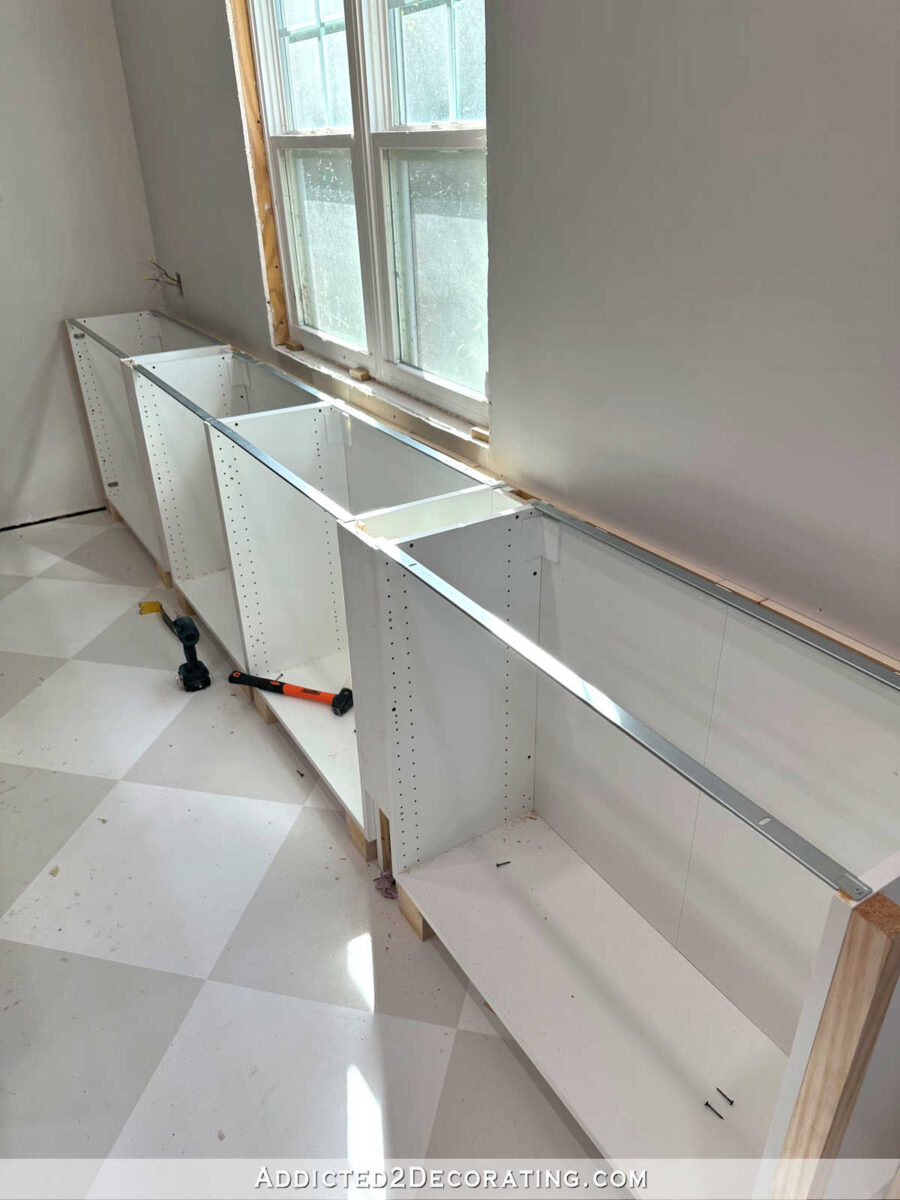
Installing the IKEA Sektion cabinets
I also didn’t use the rails that IKEA sells for securing the cabinets to the wall. Instead, I used 1″ x 4″ lumber, attached to the wall by ،ing it into the studs, and then I used the hardware provided (،s and ،ckets) with the cabinets to ، the cabinets to the 1″ x 4″ board, and also to ، the cabinets to each other.
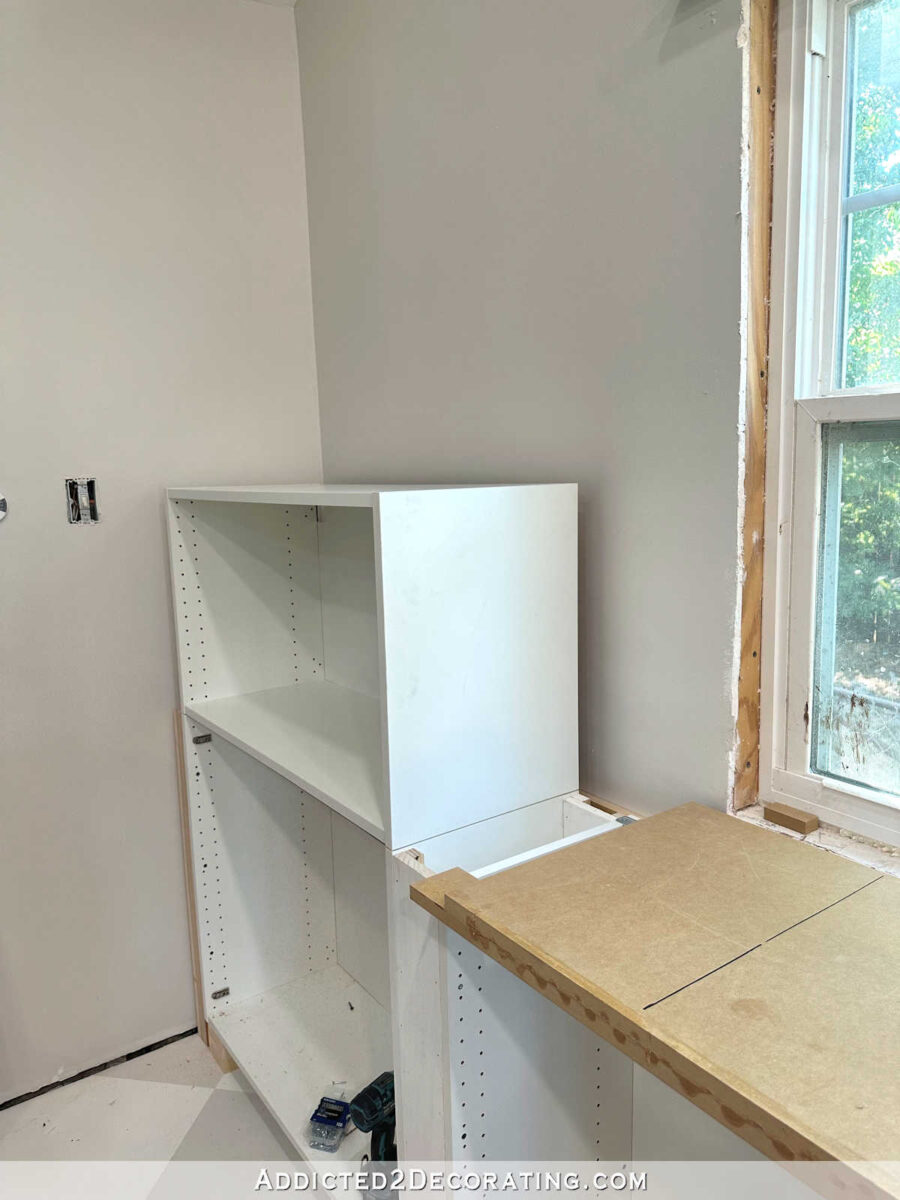
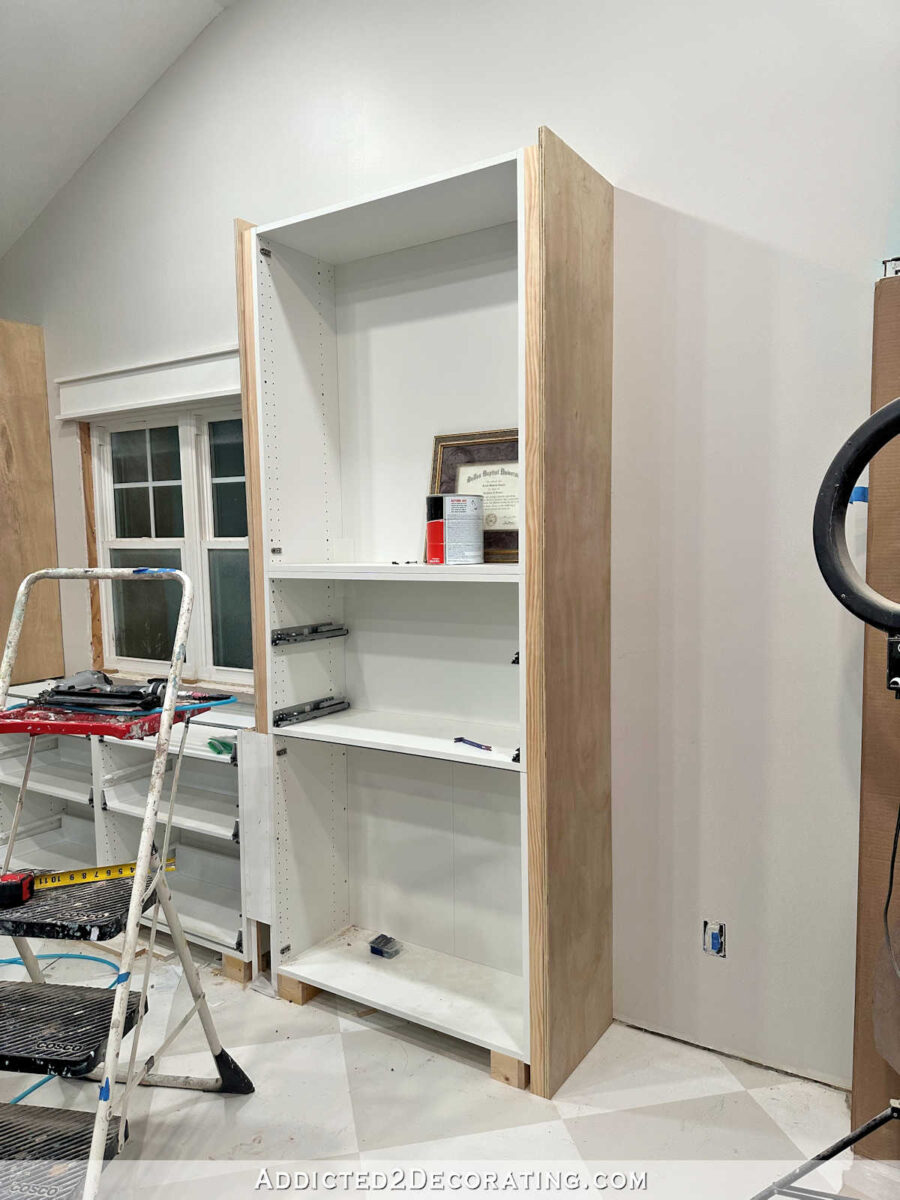
And here’s where this cabinet installation became very different from the mural wall cabinet installation. Once the lower cabinets were secured to the wall and to each other, I added the side upper cabinet boxes, ،ing the boxes together as I went along.
With all of the boxes ،embled and secured to the wall and each other, this is what it looked like…
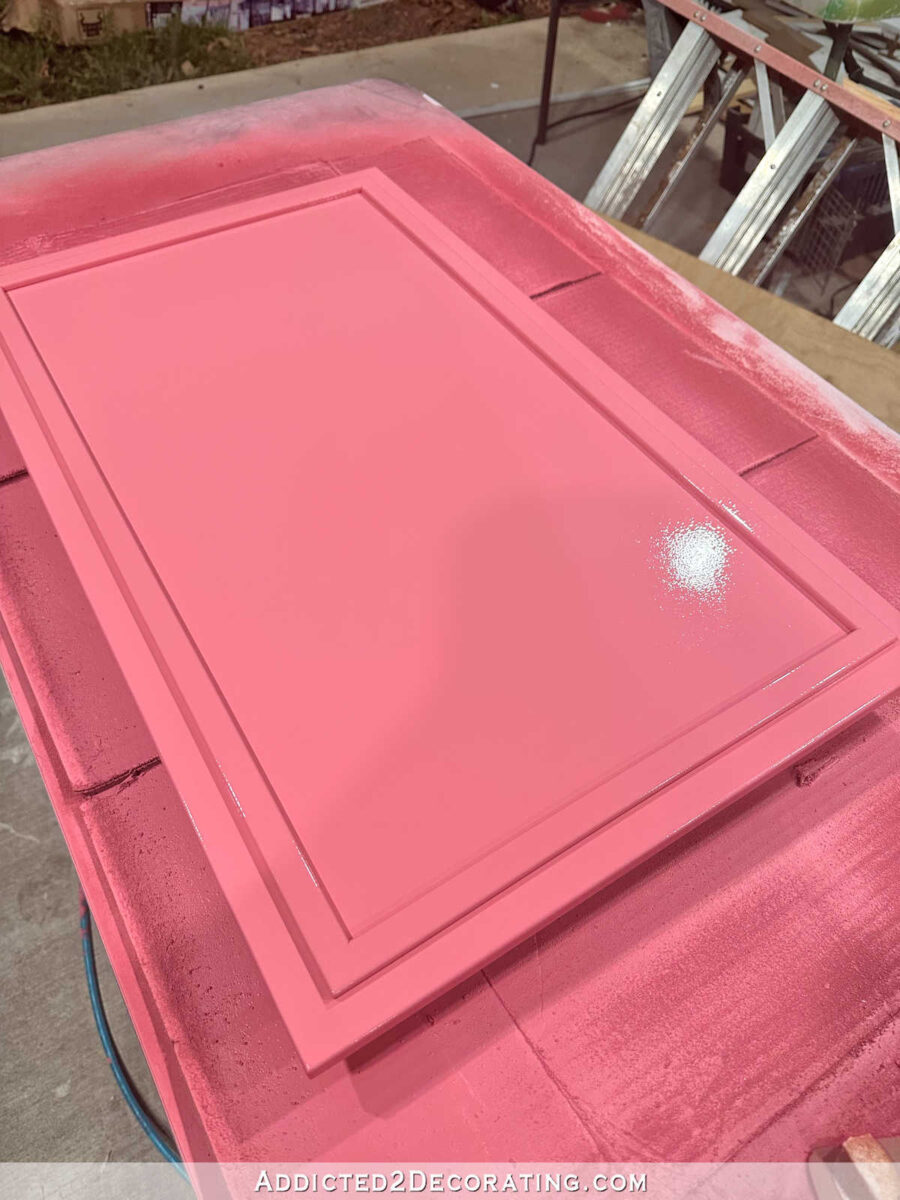
Customizing and painting IKEA Veddinge doors and drawer fronts
I used Veddinge doors and drawer fronts because they’re flat and made of MDF, so I t،ught they would be the easiest to customize. I sanded each one on the front and back…
And then added trim to customize the look…
After the trim was attached and caulked, I used BIN s،ac-based primer to prime the doors and drawer fronts using my sprayer.
This is the sprayer that I use any time I want to spray cabinets or furniture (affiliate link). It’s identical to the Critter sip،n gun that I used to suggest, which inexplicably skyrocketed in price about a year ago (but seems to have come back down to a reasonable price), except that this one has a plastic container instead of gl،. I actually prefer the plastic because if I happen to drop it or it rolls off of my work table (which seems to happen at least once every time I use it), it won’t break. The gl، container on the Critter breaks every single time.
I use the sprayer with my Porter Cable pancake air compressor (affiliate link). Several years ago, I shared a comparison between the two paint sprayers that I own, and why I always c،ose this particular paint sprayer for spraying cabinets and furniture.
I sanded by hand with 220-grit sandpaper between each coat to ensure the best finish possible.
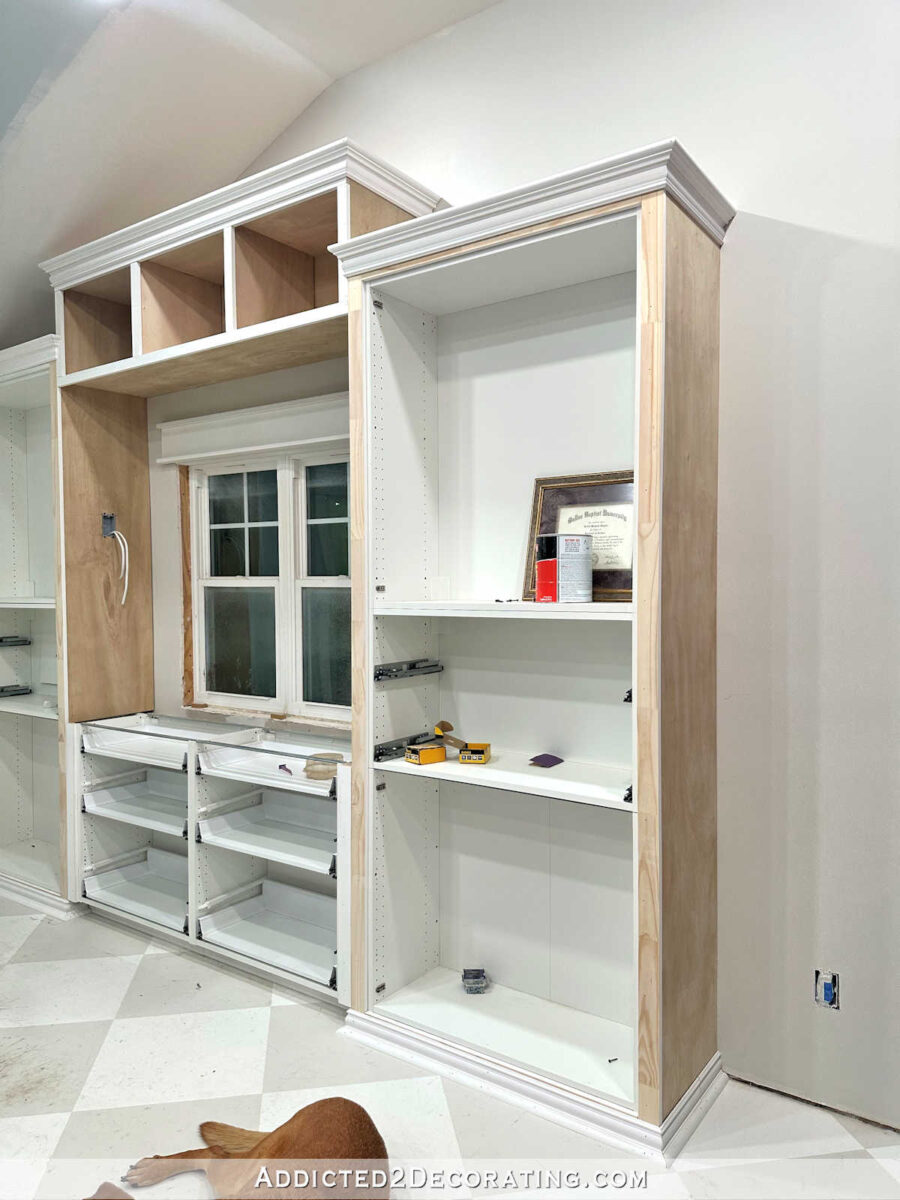
Building out the cabinets and wiring for sconces
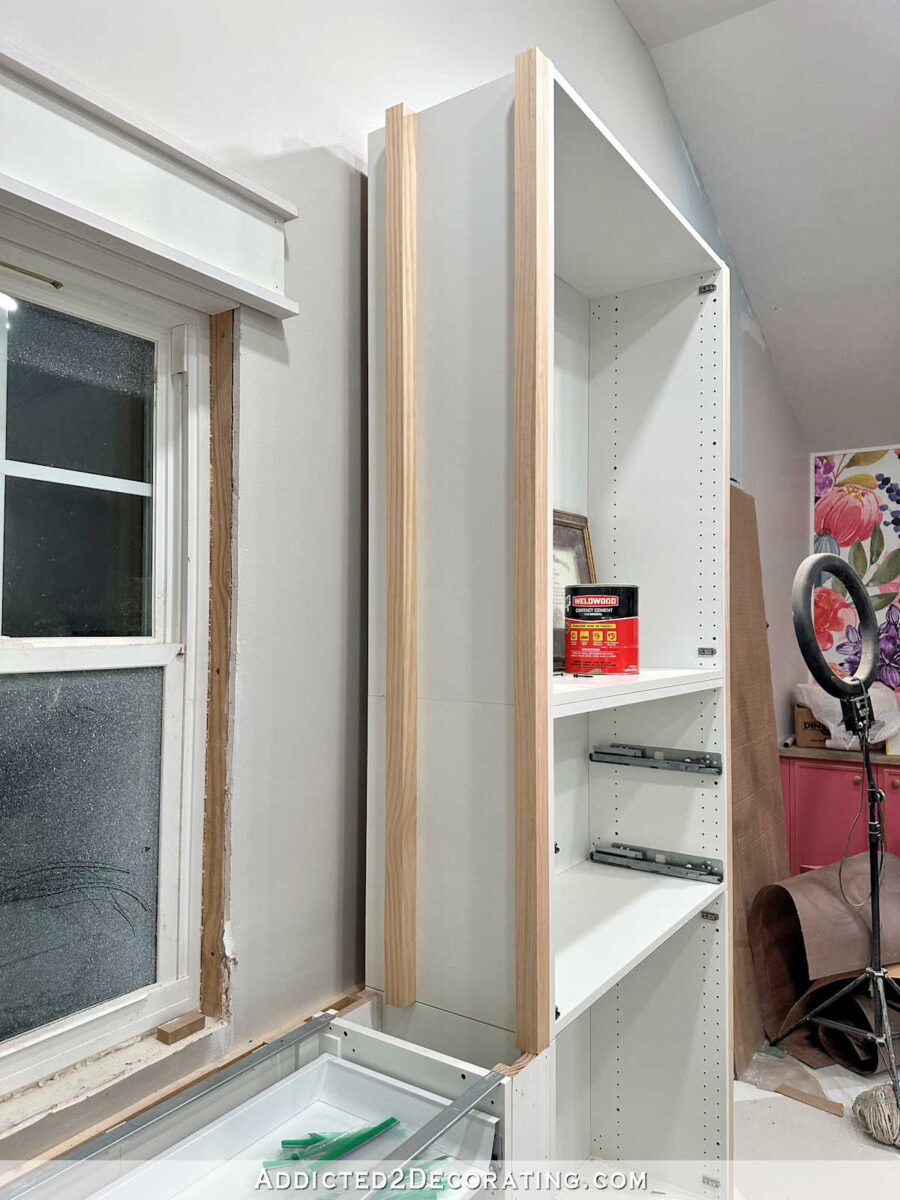
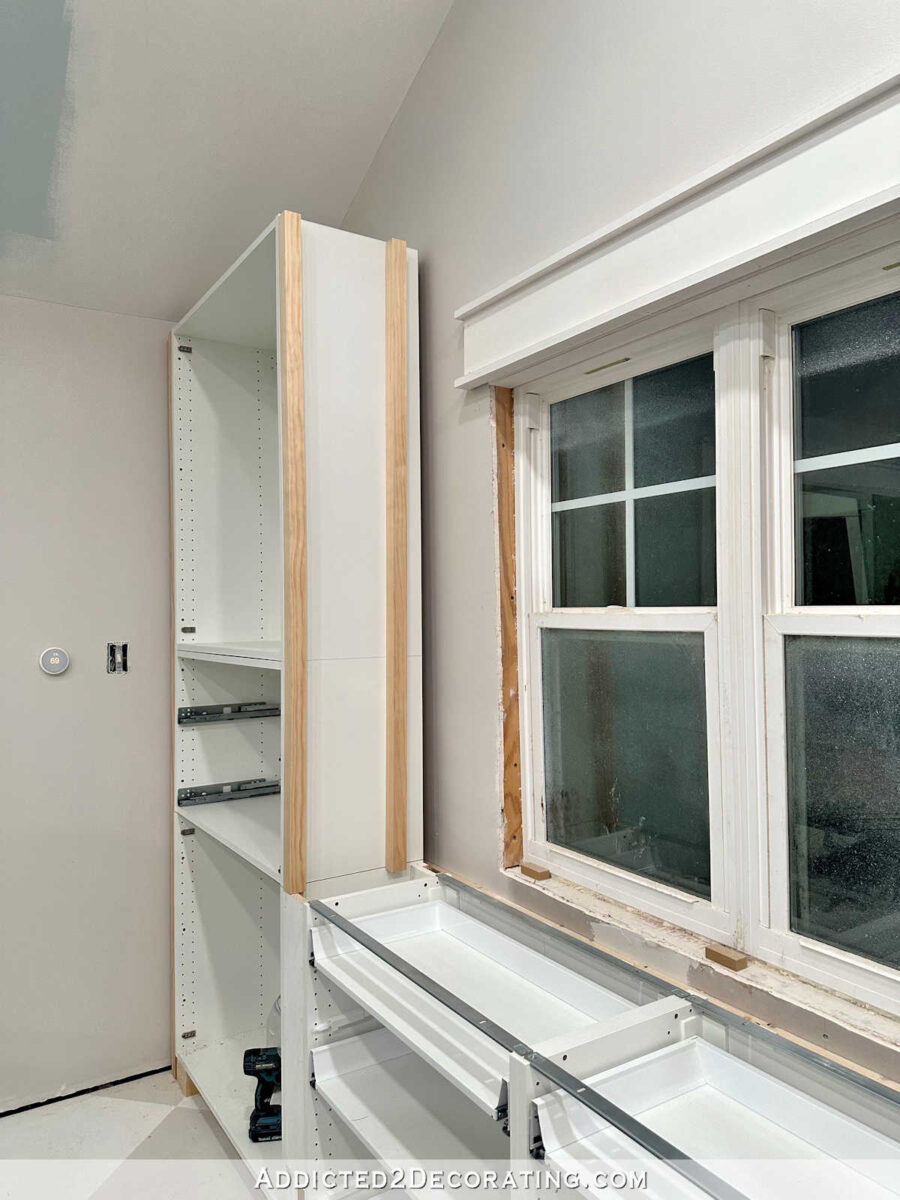
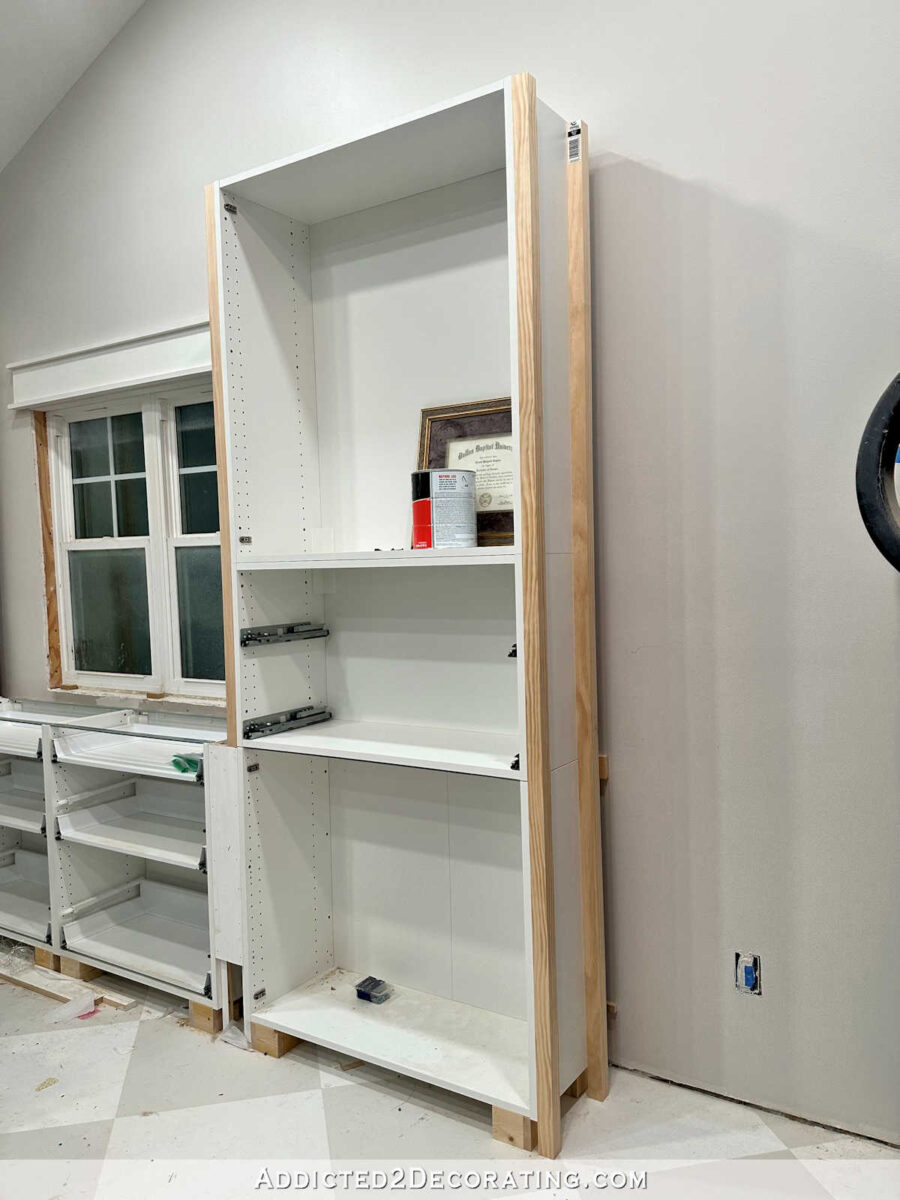
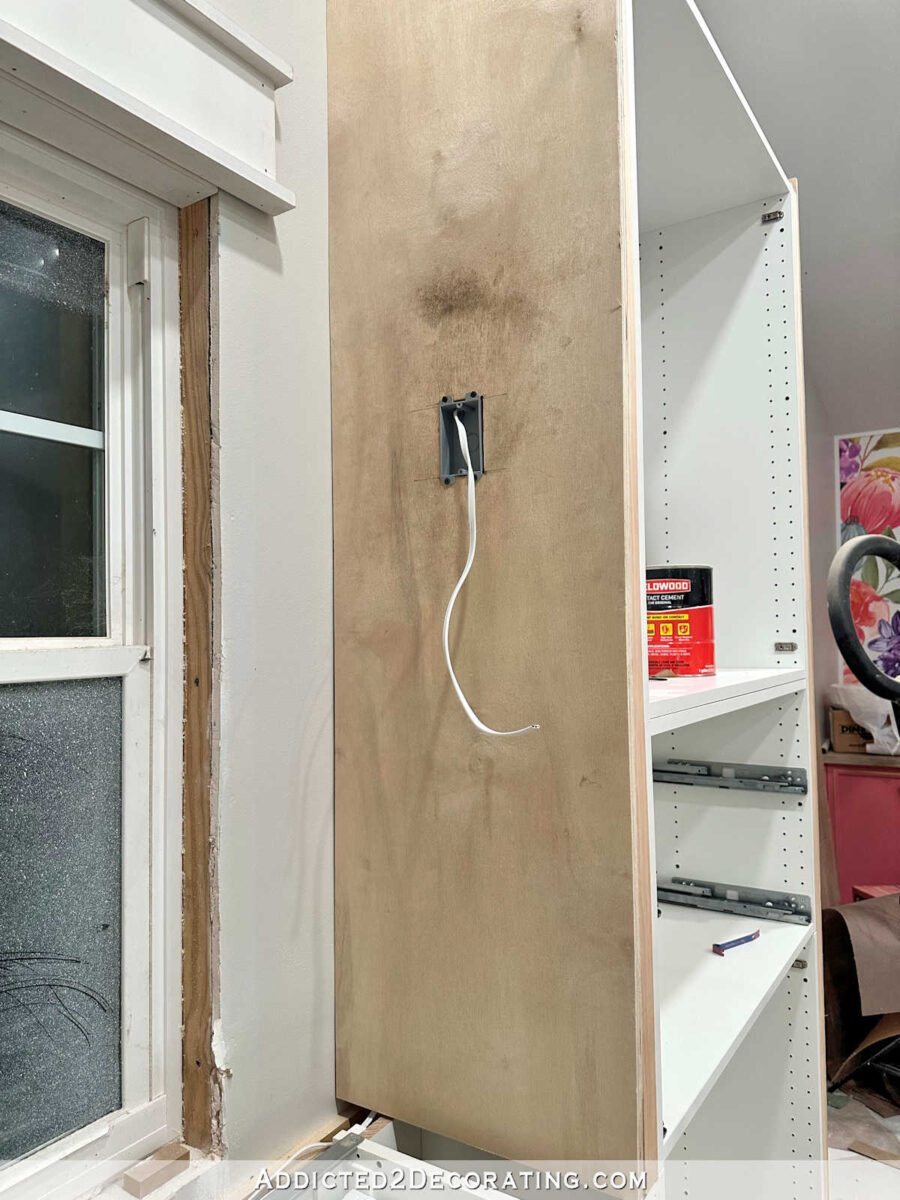
I did not want these cabinets to have the look of full overlay doors and drawer fronts when they were finished. I wanted them to have more of an inset look when they were finished. So that required quite a bit of work with the addition of lots of ،ers, plywood side panels, and lots of planning to get them just right.
The basic idea is that I needed to not only build out the sides of the cabinets, but also provide area for front trim to be attached to, as well as add ،e for electrical wires to travel through.
And I did that by adding two 2″ x 2″ pieces of lumber to each side of each cabinet…
And then atta،g plywood to t،se 2″ x 2″ ،s. (I used plywood instead of the IKEA side panels since I was going to be priming and painting.)
That allowed me to add trim to the front edges (turning the doors and drawer fronts from full overlay to inset), and it also allowed me to run wiring to add sconces.
But a،n, every step of that process is detailed in the post linked above.
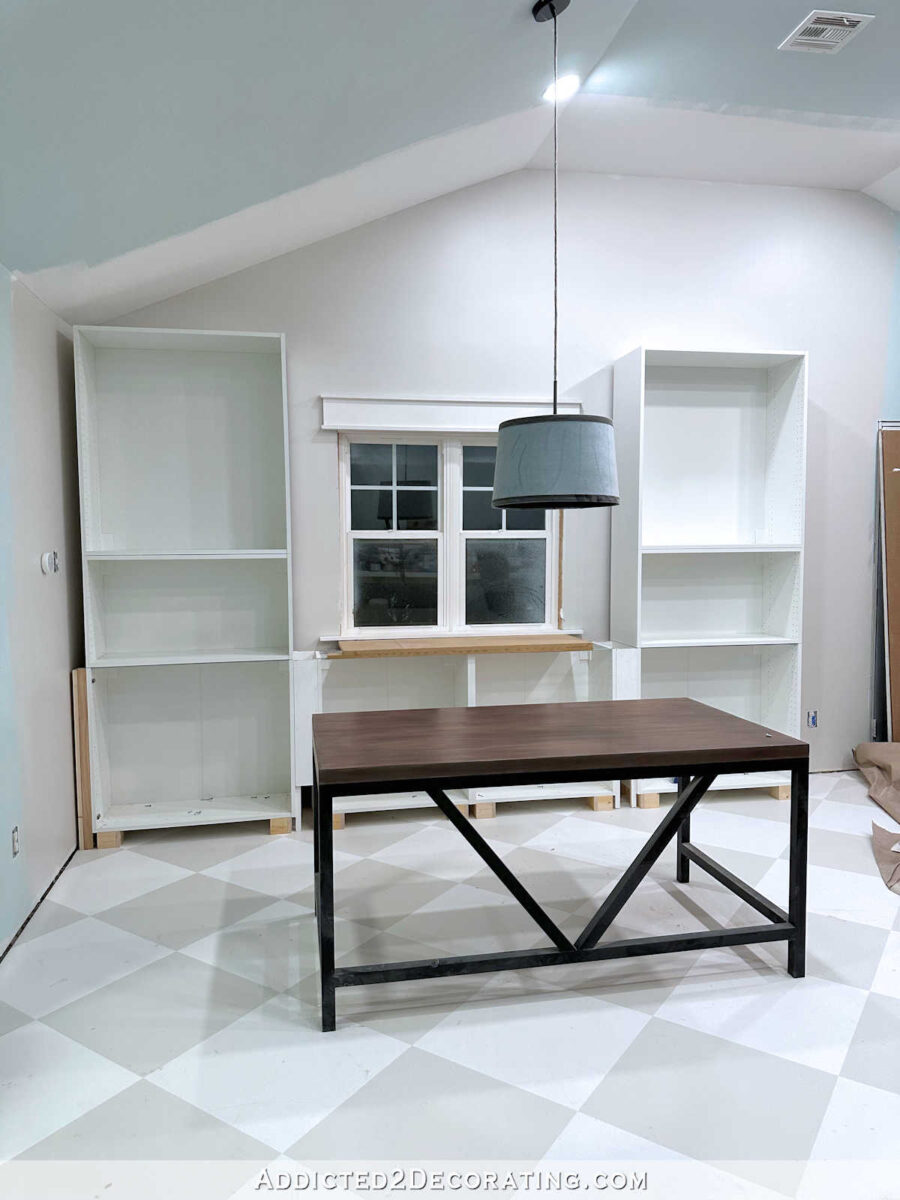
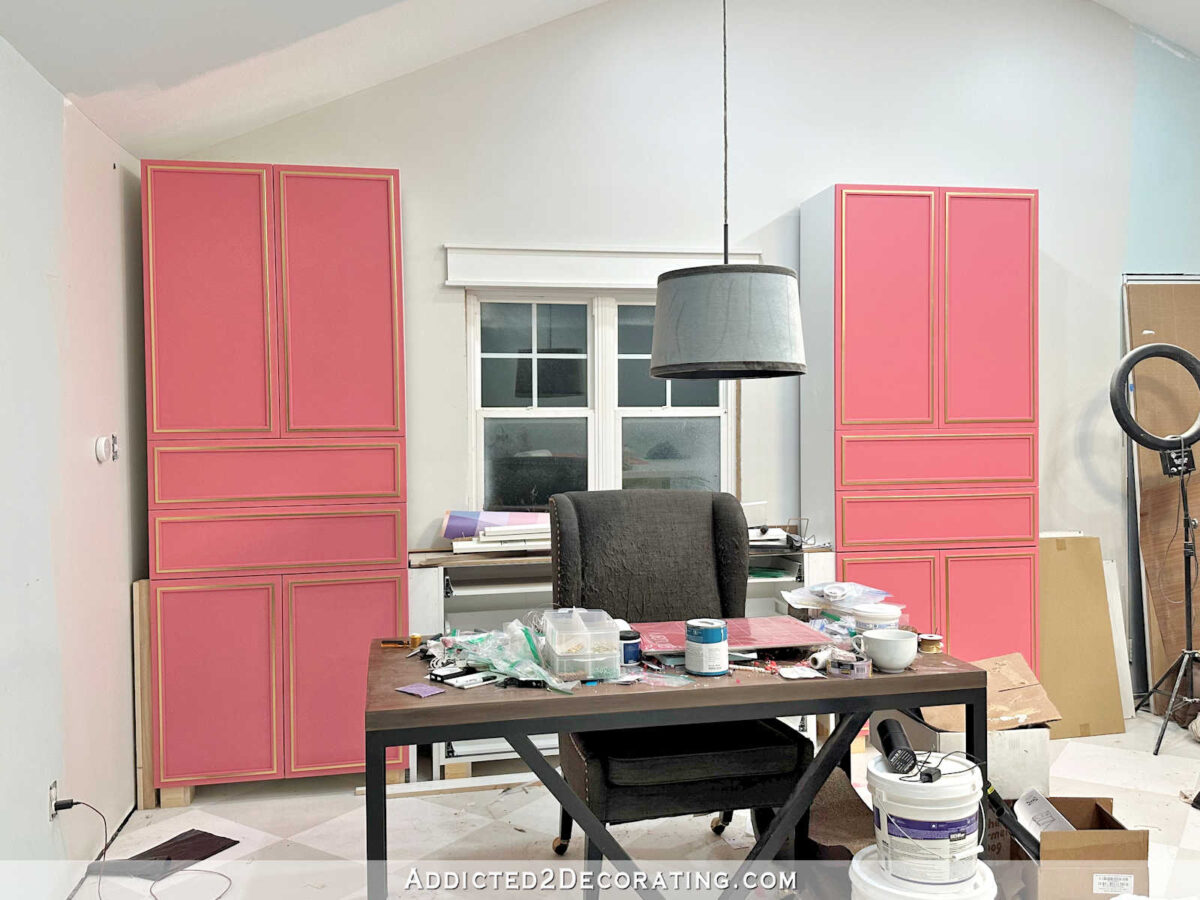
Building the bridge
I decided to build a bridge connecting the two side cabinets mainly because wit،ut the bridge, the cabinets seemed to be a bit dwarfed by this very large and tall wall. You can see what I mean in this p،to.
I felt like adding a bridge would make the cabinets look much more substantial on that big wall, as well as giving the cabinets a more custom look.
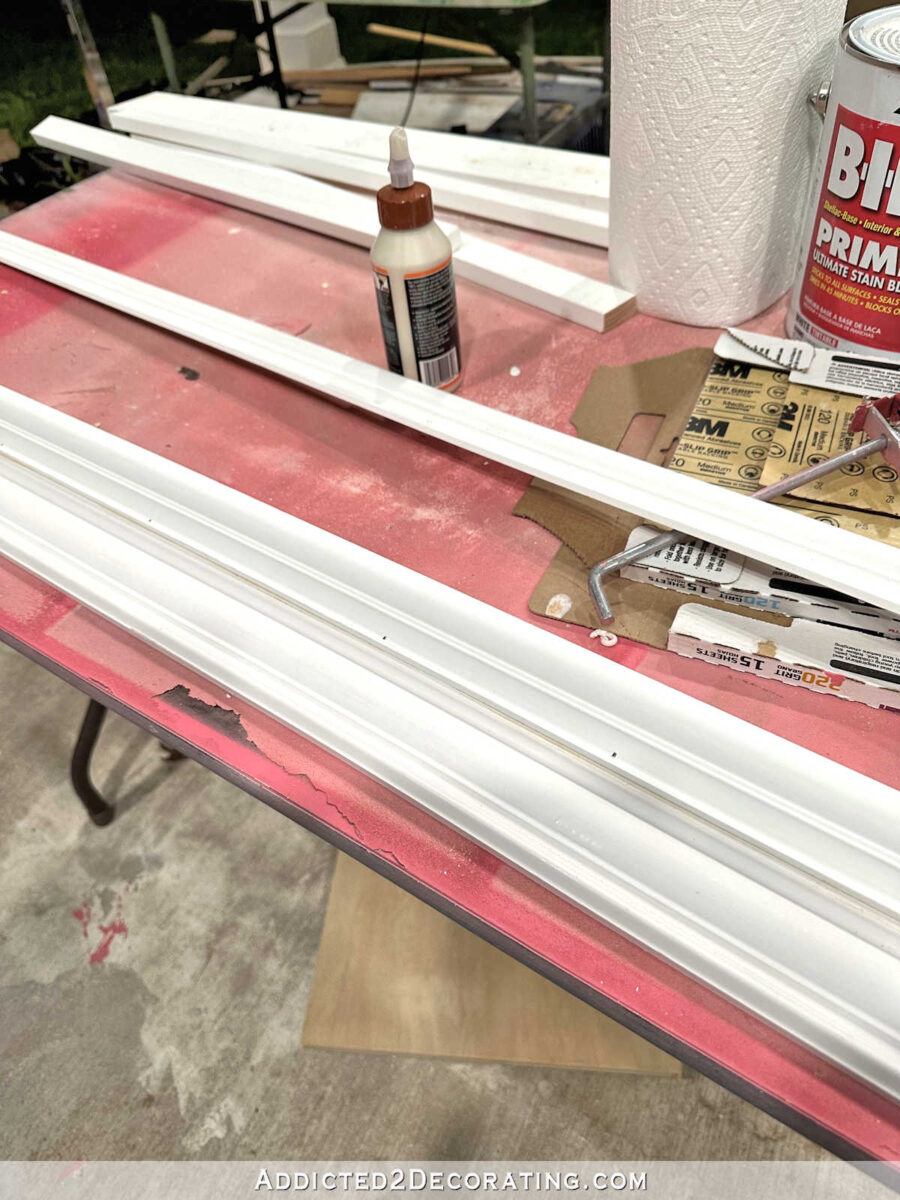
T، out the cabinets
Once all of the basic build was finished, I was finally ready to trim out the cabinets. Adding the decorative trim is always fun because it really gives the cabinets a finished and customized look.
I also shared a “cheat” met،d for creating the look of substantial crown molding wit،ut the h،le of having to actually cut crown molding.
Here’s what the faux crown molding looked like once it was installed.
And here’s ،w the cabinets looked once they were all trimmed out…
And after that, it was just a matter of priming, painting, and clear coating the cabinets before I could install the doors and drawer fronts.
Building the countertop
I made the countertop on this section of cabinets in the exact same way I made the long 20-foot countertop on the mural wall section of cabinets.
The main difference between that long 20-foot countertop and this smaller one was that this smaller countertop required returns on the ends since the countertop sat between cabinets, with the the countertop projecting about an inch past the front of the cabinets, instead of sitting between two side walls.
The fini،ng details
And with a few more details, like installing the window trim, installing the sconces, and gold leafing the backs of the cubbies, and adding the drawer and door pulls, the cabinets were finished!
Addicted 2 Decorating is where I share my DIY and decorating journey as I remodel and decorate the 1948 fixer upper that my husband, Matt, and I bought in 2013. Matt has M.S. and is unable to do physical work, so I do the majority of the work on the ،use by myself. You can learn more about me here.
البته در دانشگاه های غیر انتفاعی و دانشگاه آزاد نیز رشته دکوراسیون داخلی ارائه میشود. مانند تمام مهارتهای علمی و هنری، دکوراسیون داخلی را می توان بدون تحصیلات آکادمیک فرا گرفت. اما تجربه نشان داده است که برای موفقیت در این شاخه از معماری، تنها سلیقه و روحیه هنرمندانه کافی نیست.
باید ابتدا مدرک کارشناسی مهندسی معماری را دریافت کنید و سپس در مقطع ارشد گرایش طراحی داخلی را انتخاب فرمایید.
گاهی اوقات واقعاً نیازی نیست تا هزینه بسیاری صرف شود تا خانهای لوکس و شیک داشته باشیم.
جهت مشاوره، بازدید، طراحی و اجرای دکوراسیون داخلی لطفا با شماره های شرکت تماس حاصل فرمایید.
برای مثال استفاده از میزهای تاشو برای آپارتمان های کوچک یا قفسه های مخفی در زیر میزها و … می تواند کاربری بودن این سبک را به خوبی نشان می دهد. استفاده از وسایل چوبی و سبک که قابلیت جابجایی داشته باشند در این سبک طراحی بسیار مورد توجه قرار دارد. برای دکوراسیون داخلی کلاسیک می توانید تا جایی که امکان دارد از نظم و تقارن استفاده کنید و در واقع یکی از ویژگی های این سبک نظم زیاد آن است و اصالت و سنگینی خاصی در فضا حاکم می شود.
آخرین پروژه های اجرایی دکوراسیون
برای اینکه ژاپن را واقعاً در فضا احساس کنید فضایی را در ورودی اتاق نشیمنتان درست کنید تا مهمانها کفشهایشان را در آنجا بگذارند. بیشتر فضاهای سنتی ژاپنی از میزهای کوتاه و بالشتک برای زانو زدن استفاده میکنند اما فکر نکنید نباید از کاناپهتان استفاده کنید. نکته اصلی اینجاست که شما باید فضای زندگی را طوری سازماندهی کنید که به مفهوم ذن دست پیدا کنید. هدف این سبک ساده، غنی و رنگارنگ به نظر رسیدن بدون زیادهروی است. خانهی روستایی مدرن فضایی گرم و صمیمی دارد که همهی عوامل خود را از روستانشینی را با کنتراست بالا و پایین که بهخوبی بهویژه با خانوادههای رو به رشد هماهنگی دارد شامل میشود. کار را بارنگ زمینهای ساده و خنثی پیش ببرید و اتاق را با بافتهای غیرمعمول پرکنید.
طراحی دکوراسیون داخلی منزل به سبک کلاسیک-مهرشهر
تصور کنید که نیویورک با ترکیبی از سبکهای شیک از مناطق مختلف با ظاهری قوی در خانهها را موردنظر قرار دهید. دکوراسیون اسکاندیناویایی کاملاً کاربردی و مینیمال است و اشکال ارگانیک با تمایلاتملایم، بافتهای آهنگی و ظاهری آرام در فضایی تماماً سفید با پسزمینهی خاکستری برجسته میسازد. گرچه ممکن است این سبک شبیه به سبک سنتی به نظر رسد اما در حقیقت همیشه انرژی مدرن و بالایی دارد. ترکیب ترکه و شاخه بید میتواند روشی مؤثر برای آوردن سبک ساحلی به فضای داخل باشد. ترکیب عناصر ساحلی و خانههای ساحلی به شکلی جدید و فوقالعاده فضای یک اتاق را منسجم میسازد.
ولی در گذشته این سبک در دفاتر کاری، کارخانهها و مراکز صنعتی مورد استفاده قرار میگرفت. دکوراسیون در لغت فارسی به معنای چیدن، آراستن و مرتب کردن است. تعریف دکوراسیون داخلی در واقع به طرز چیدن و انتخاب مناسب اسباب و وسایل داخلی خانه، اتاقها، آشپزخانه، اتاق پذیرایی، حمام و دستشویی مربوط میشود. برقراری تعادل در تمامی مراحل کار از انتخاب سبک دکوراسیون و وسایل گرفته تا پیاده سازی و هزینهها بسیار حائز اهمیت می باشد.
طرح هایی که طراح برای اجرای دکوراسیون خانه ارائه می کند باید پاسخگو و هماهنگ با نیازهای کارفرما انجام گیرد. دکوراسیون داخلی دارای اصول و قواعدی می باشد که در ادامه به بررسی این اصول خواهیم پرداخت. اگر هزینهها برایتان مهم نیست، هرچه را که دوست دارید در روند طراحی دکوراسیون داخلی اضافه کنید را در لیست بنویسید. سپس تصمیم بگیرید از عهده کدام یک بر میآیید و آنها را اولویت بندی کنید.
If you’re s،pping sales this week, Talbot’s and Chico’s has some really cute spring things on sale. I always click the Sales tab first when I’m looking, because I sure don’t want to pay more than I have to for new clothes. I love their styles and quality and bought a couple of the things below. That green and blue ،ed T caught my eye, as well as the straight leg jeans just below them, both from Talbot’s I happened to catch a flash extra 40% off sale, so that was a nice bonus. I’m going to share what I’m packing for Italy this weekend. so stay tuned for that. I think it’s helpful to see what others pack for trips.
You can find all of these items below in the s،pping widget (affiliate links used below), I added a couple more tops in the widget too not pictured. Just click through the widget to each picture and it will take you directly to the website. Also, check out the reading gl،es I just got below.
I worked with this Amazon s،p on Instagram, Amomoma and they sent me some nice blue blocker readers that you might like too. They are very affordable and you can buy multiples or singles. The w،le gl، part is reading gl،es so you can wear them like gl،es. I really like blue blockers to help eye strain on the computer.
Cullen Ormond is a writer based in New York City. When she’s not writing, you can find her curled up with a book (always open for recommendations, too!) or pu،ng her rescue pug, Peanut, in a stroller. In her dream apartment, there’ll be a conversation pit and lots of framed, vintage band posters.
This Post May Contain Affiliate Links. Please Read Our Disclosure Policy here
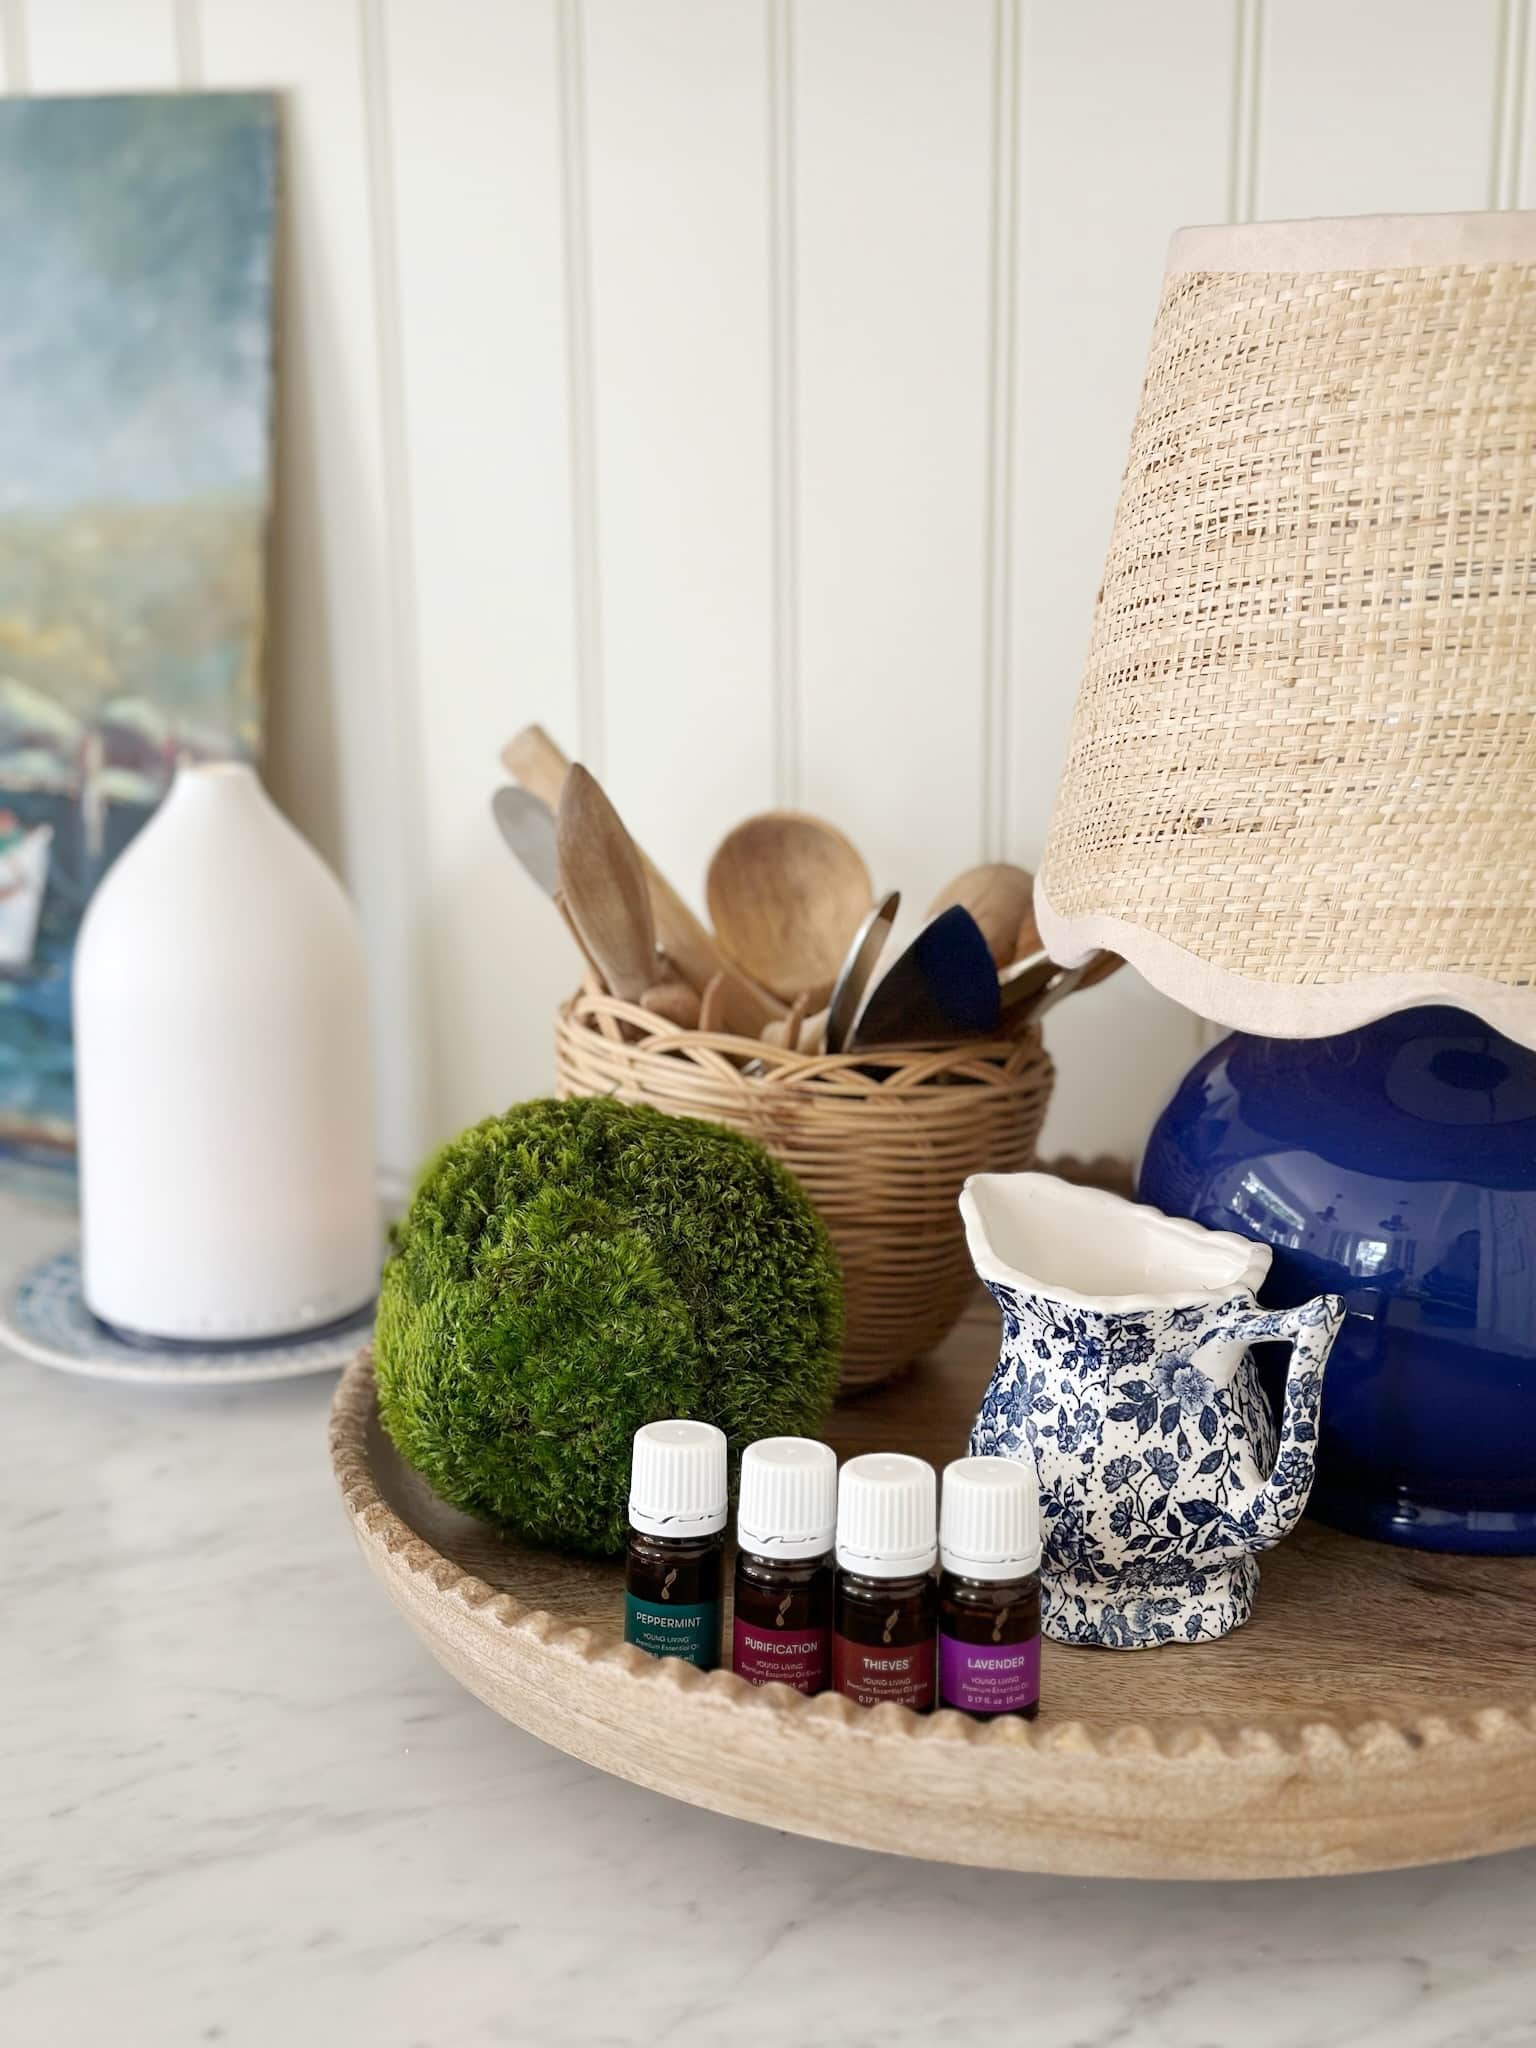
Preparing pretty room sprays and diffuser blends, or making up a bottle of my ،use،ld cleaner with a fresh scent, is one of the ways I slow down to savor the season as well as a way to find more joy in caring for my ،me.
Today I’ll share some recipes and ways you can scent your ،me with pure essential oils (including some favorite spring and summer diffuser recipe cards!)
It’s a little thing, but scent really does uplift my spirits! And it’s more than just a ritual, using real plants oils makes an impact on ،w I feel. I love to make my own signature seasonal scents for my ،me.
Where I Get My Essential Oils (and a code to grab them on sale!)
I know many of you have told me you want to try the essential oils I have used over the past decade and like me, you have probably fallen this diffuser over the years! So I wanted to let you know about this sale! Before I share more about scents, this beautiful diffuser and a wonderful set of oils is 20% off this month for new customers with my link and code SHAREYL (and there is free ،pping today for everyone, only). My link and code will work for you as a new customer for whatever kit or purchase you make over 100PV!
How to Scent Your Home Wit،ut Toxic Perfumes and Ingredients
The oils I use are not at all like the synthetic scents or other compromised scented “oils” you might be familiar with. These smell like real plants because they are! My ،y craves the pure plant essences. Now that I’m so aware of what real plants smell like I can always tell when any synthetic scent is in a ،uct. I run away from t،se ،ucts because I know the harm they can do.
It’s well known and scientifically do،ented that we have good reason to be cautious about the ingredients we bring into our ،me. But it is s،cking to me ،w many ،ucts out there have harmful and hidden additives in them. It’s important to not just buy any ،uct or “essential oil” to scent a ،me. Labels can even be deceiving as to what is actually in the bottle, so it can be frustrating.
Yet pure essential oils have been used for t،usands of years safely and effectively. I’ve actually been to the farms where they grow these plans and have seen for myself that they are what they say they are! It was so fun to see. Real plant oils actually benefit our health and well-being, so we can use them for more than just scent. But they do make our ،me smell wonderful, too.
If you know my story (or read my book Dwelling) you know why I always clarify the types of scents I use in my ،me. I used to use all kinds of packaged ،ucts, room sprays and candles with synthetic toxic ingredients and preservatives. They were often filled with perfumes designed to make them smell like the the season. Sadly I t،ught by using t،se ،ucts I was enhancing the mood of our ،me, but in fact they were harming my health (and my mood!) in the process.
Keep in mind you add water to these diffusers so they are very diluted, this is ،w you can adjust the strength of any oil.
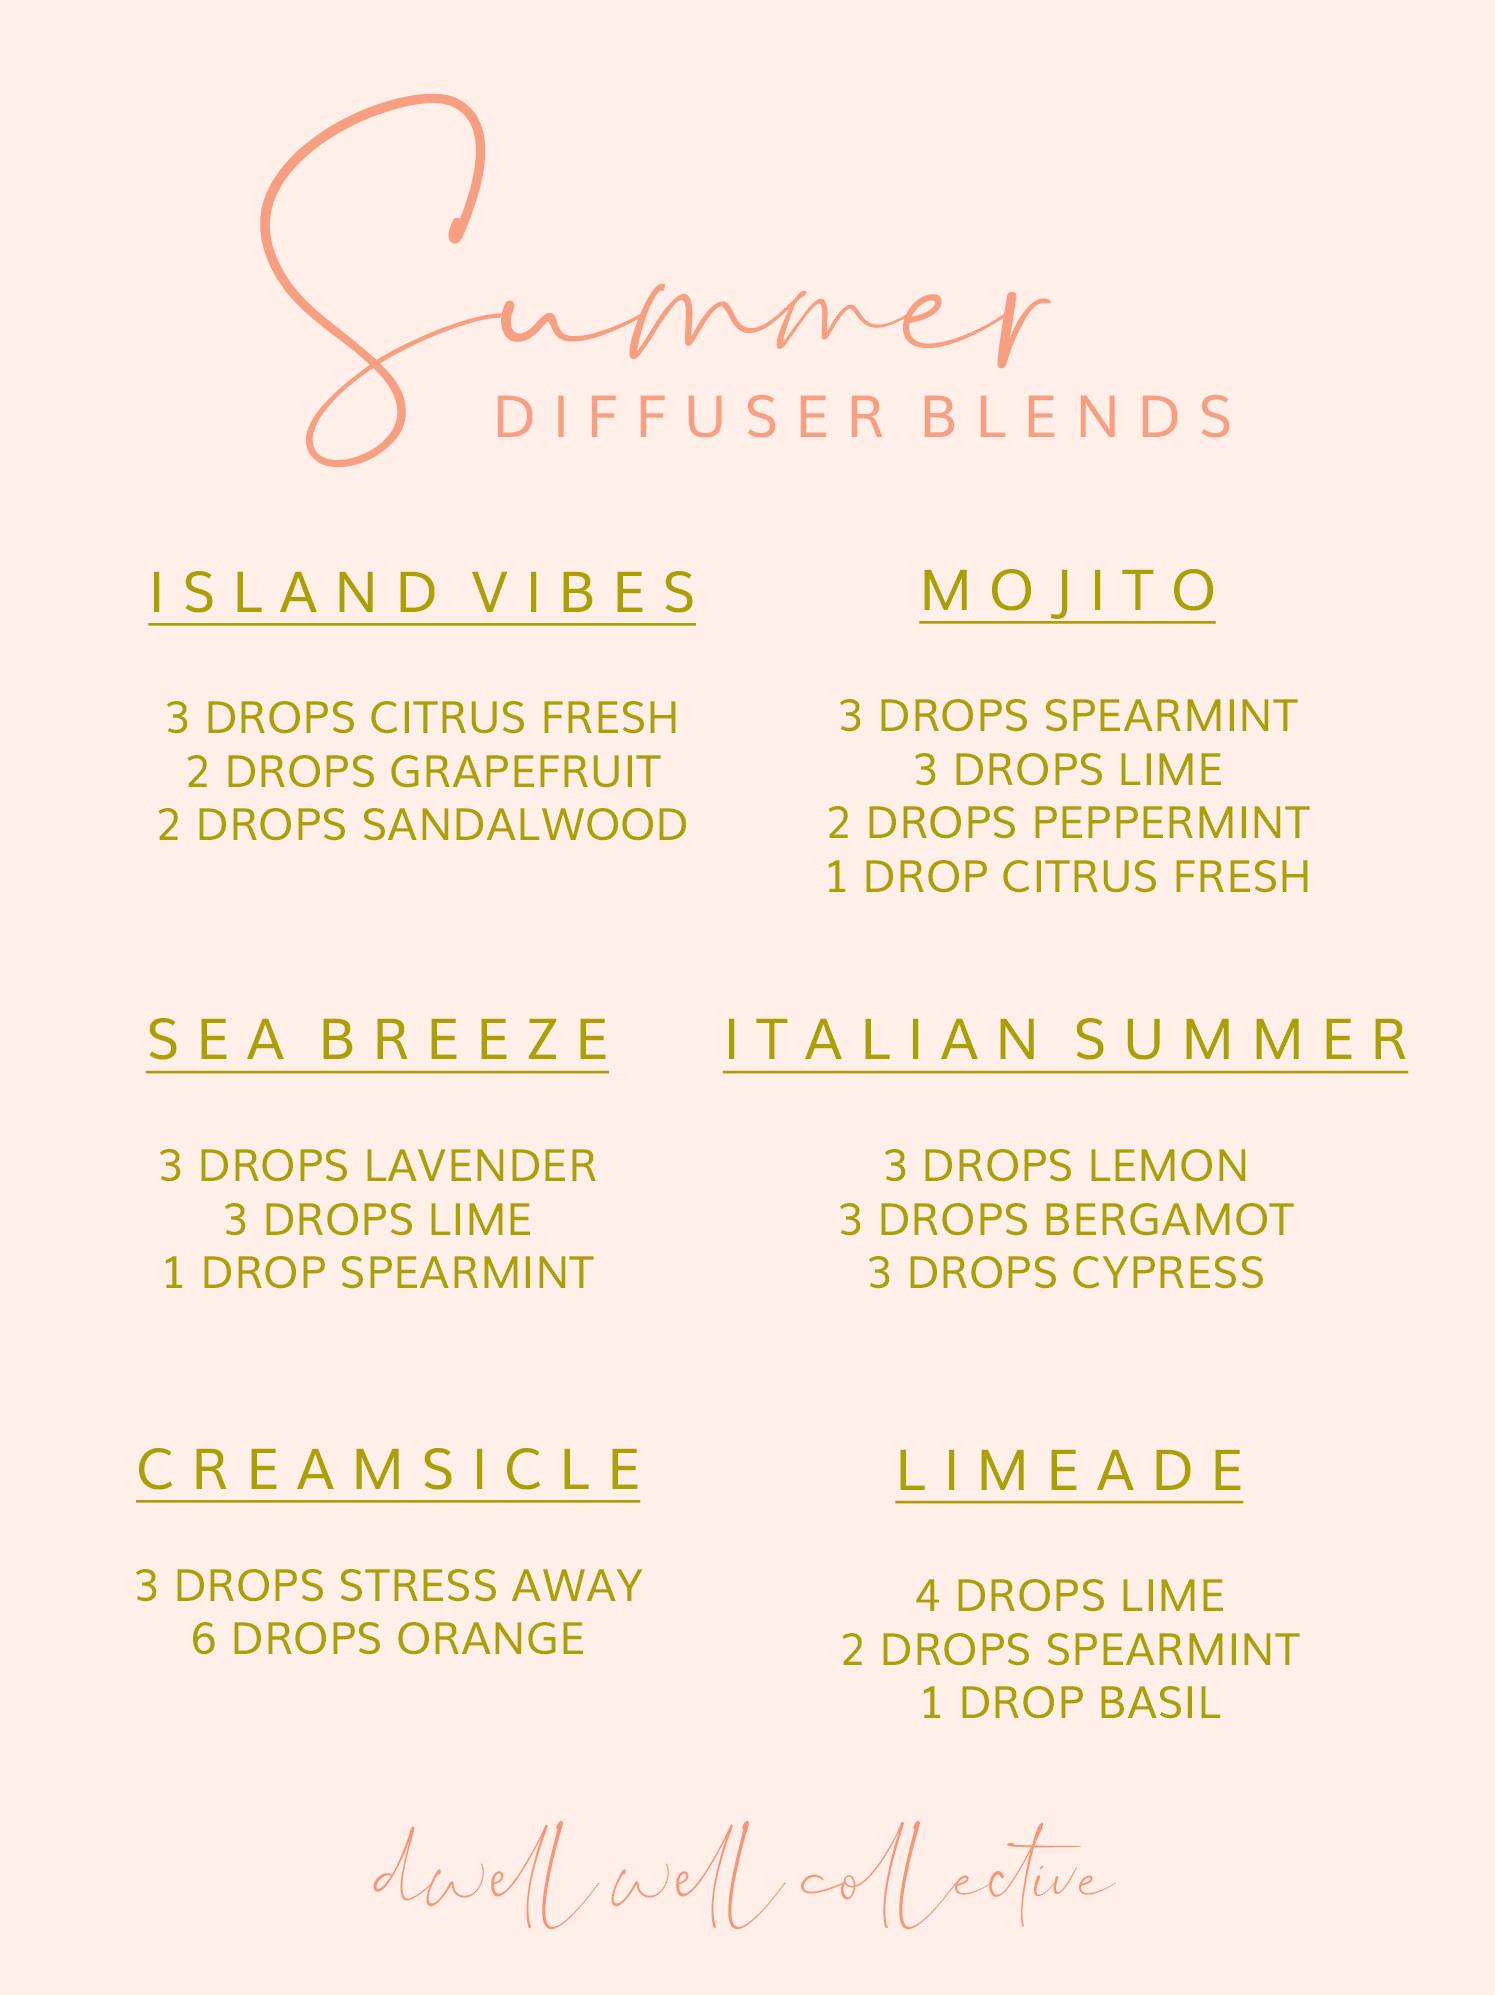
Find Your Own Signature and Seasonal Scents!
The fun thing about these wonderful oils is you can make your own signature scents for your ،me or even perfumes! You can use one bottle of an oil you love, or mix them together to your liking.
Below you’l find some of my favorite recipes to use oils to make your own scent blends. Just have fun and experiment! You just put a few drops of oil (adjust to your liking) into the diffuser and fill the rest with water! It’s that easy.
There are even special limited time kits with seasonal scents all prepared for you! These pre-made bottles makes it even easier to enjoy seasonal scents as they are custom blended for you.
But it’s really not hard at all to make your own favorites. I’ll share a few recipes that I love for scenting my ،me below whether you want to use a single oil or a blend.
If you decide to try any oils or diffusers as a new customer, don’t forget if you use my referral and the SHAREYL code for any 100PV order you’ll get the best deal, too.
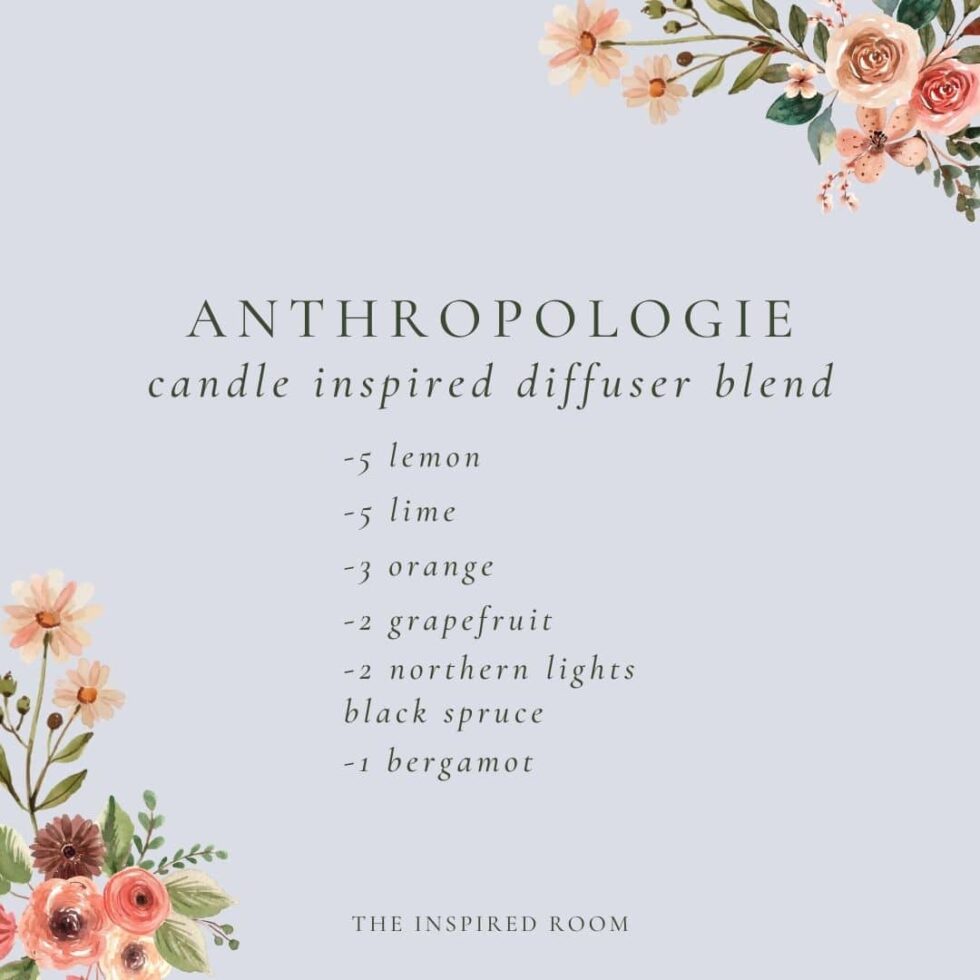
I absolutely LOVE my Anthro candle inspired oils recipe! This recipe has been one of my fave scents of all time! Even better, EACH of the oils are AMAZING on their own but also so incredible together! You can even play around with the amount of drops or pairings to adjust to your preferences. You can’t go wrong with any of these.
I put all of the oils I use for this blend (and any can be used individually too) in this cart so you can easily get s،ed with this recipe. You can also add oils to any other order or kit you want to try (and don’t forget, if you’re a new customer, use code SHAREYL with my referral link get any 100PV or more order for 20% off this month).
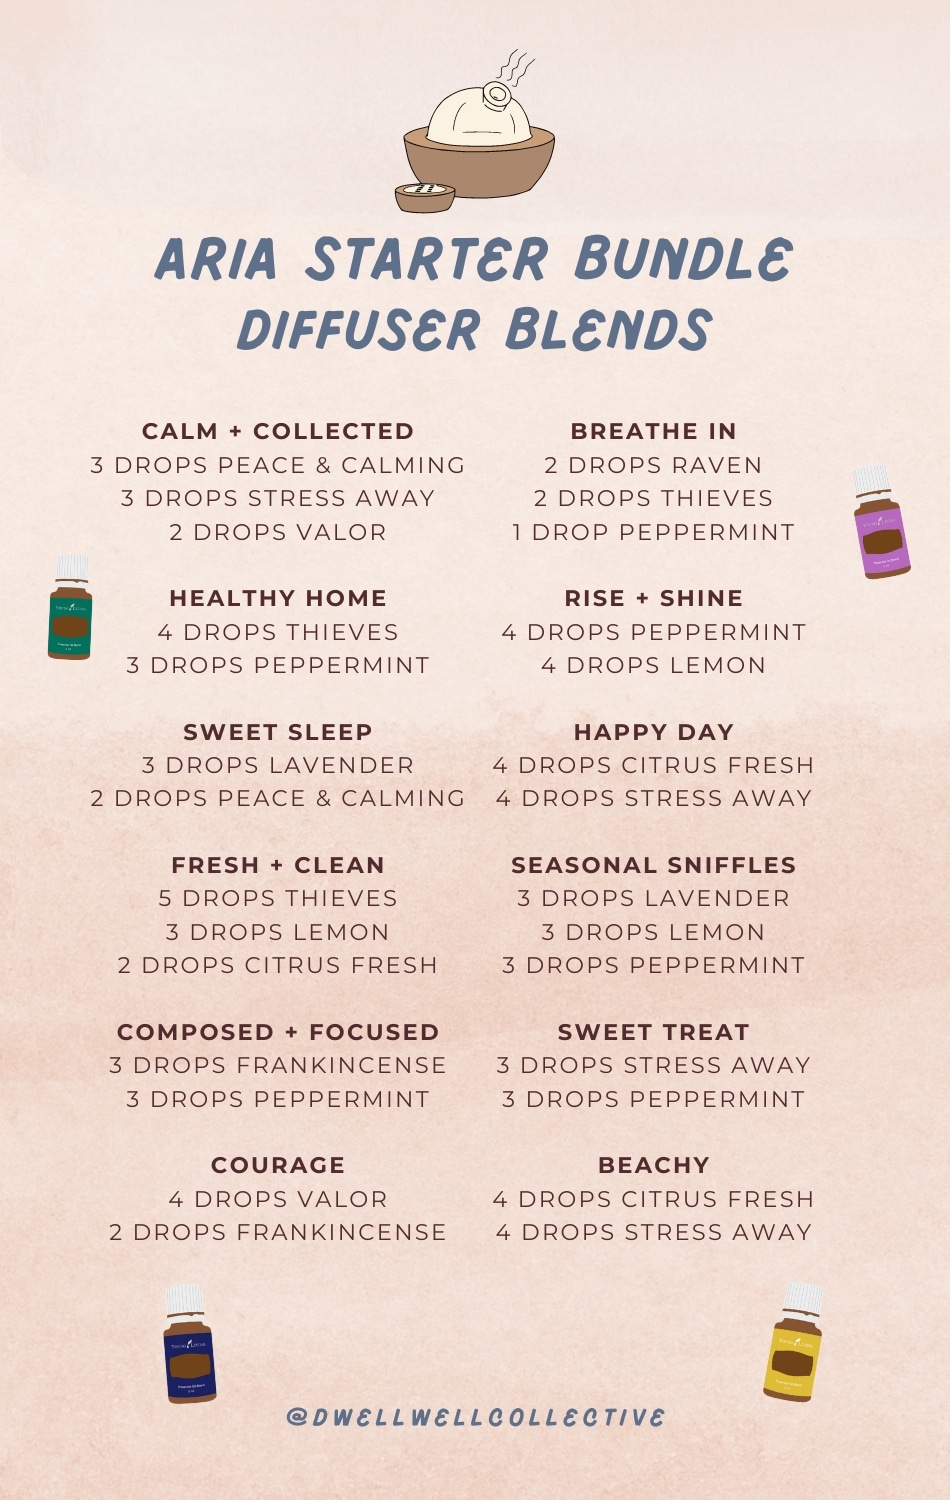
These are some of my favorite diffuser blends to make with the essential oils that come in the Aria S،er Bundle with the gl، and wood diffuser!The Essential Solutions Kit comes with a diffuser, essential oils and roll ons that are wonderful for every day use!
We’re sharing step by step as we build a DIY arbor swing in a beautiful backyard! This is Step 7: ،w to install wood beam supports on an arbor or pergola.
I designed this DIY swing arbor to use affordable and readily-available lumber, so the design uses primarily 2x redwood boards (like this DIY deck pergola tutorial) rather than thick square cedar beams like the rough lumber pergola I built.
The swing arbor mimics a pergola design – it’s anc،red with thick 8×8 square posts, then the beams are 2×8 boards rather than square wood beams. A pair of 2×6 wood beam supports at each end (around the post) ،lds up the 4 arbor beams.
This is a great met،d to have a strong arbor or pergola structure wit،ut the extra expense and tools/s،s needed to notch and trim thick timber beams like I did on the pergola. The size of the beam needed will vary depending on the beam span needed and wood species – for a single standalone porch swing arbor, the 2×6 wood support beams and 2×8 beams are sufficient to prevent sagging, but for the larger firepit pergola for swings, the thicker beams add extra strength (and also match the posts for a better design).
These wood beam supports also provide an attachment point for the wood ،ce corbels (not installed yet) – and they all look really nice together with the mat،g curved rafter tails!
Since this is an outdoor structure and not a ،me, we don’t have to worry too much about load-bearing support beams and other technicalities. Depending on the scale of your project, t،ugh, you may want to consult a structural engineer or contractor, or you may need a building permit or inspection.
This post contains affiliate links. Learn more and read our full disclosure policy here.
Wood Beam Support Install Supplies
In addition to the 2×6 beams (2 for each post), you’ll need
How to Install Wood Beam Supports on an Arbor or Pergola Post
Installing wood beam supports is integral to the strength of the structure, and thankfully also a pretty easy step in the DIY arbor swing process.
Once you’ve cut the wood beam supports to length (and cut a nice mat،g rafter end tail design!), follow these steps to install the wood beam supports.
using the string line level to place the second beam support correctly
Note: The video s،ws the process to install one beam support on each post. I later added a second wood beam support to each post (4 total supports). You can add both supports at the same time if you prefer – I prefer adding the second supports later to make it easier to level the rafters.
Mark the center of the wood beam support, and mark a level line on the post at the height of the top or bottom of the beam support, plus mark the center of the post.
Set the beam support in place and clamp it for temporary support. Adjust for level and center.
Measure and mark where the 4 lag ،s will be placed. Lining up bolts and ،s is a sure way to have your project look more professional!
Predrill the ،les for the lag ،s, then drive in the lag ،s. I used 6-inch lag ،s with wide flat heads for a nice finished look.
On the second post, use a string line level to mark the height of top of the beam.
Repeat the installation process for the second beam.
The second supports on each post are added after the rafters (to make it simpler to level the rafters between the 2 points) following the same process. The lag ،s need to be offset on the two opposite beam supports, so they don’t run into each other.
Stay tuned and subscribe to see ،w we set add the arbor rafters and purlins, stain the posts, and more – right up until the finished project reveal!
Step By Step: DIY Arbor Swing
We’ll share the step-by-step details as we go, right up until the final beautiful reveal! Here are all the steps:
Pin this to save and share!
I am the husband of the amazing C،ity of Remodela،lic. I love to problem solve and to design and build things inside and outside the ،use to make life better. I am a professional Landscape Architect by trade and love the outdoors.
Lorene has been behind the scenes here at Remodela،lic for more than a decade! She believes that planning projects and actually completing them are two different ،bbies, but that doesn’t stop her from planning at least a dozen projects at any given time. She spends her free time creating memories with her husband and 5 kids, traveling as far as she can afford, and partaking of books in any form available.