اولین نوع برآورد هزینه طراحی دکوراسوین داخلی به شکل ساعتی است که بیشتر به مشاوره ها اختصاص دارد. در نهایت نور پردازی می کنید ؛ متریال می دهید ؛ مبلمان می کنید و در آخر پروسه ی رندر را تهیه می کنید. در این ادامه ما می خواهیم قوانین مهم طراحی دکور داخلی را برای شما بیان کنیم.
رنگها و طرحهایی برگرفته از طبیعت و جنگل، جزئیات فلزی و تزئینات خاص، پارچههای رنگارنگ و متریالهای گرم در خانههای جنوب غربی زیاد دیده میشه.
تمامی لوازم تولیدی ایت کارخانه دارای گارانتی شرکت میباشند و با استفاده از مدرن ترین ماشین آلات روز دنیا تولید میشوند.
این ترکیب رنگی، گرایش افراد به فعالیت بیشتر در طول روز را افزایش خواهد داد.
بهتر است بیشتر از شیشه و استیل و رنگ های سفید و نقره ای در فضا استفاده شود و هر چه وسایل صاف و صیقلی تر باشند این سبک جذابیت بیشتری خواهد داشت. در این محتوا به معرفی ۱۰ تا از بهترین شرکت طراحی دکوراسیون داخلی می پردازیم. انتخاب رنگ مناسب با توجه به هدف و نوع شغل، چیدمان وسایل و میز و صندلی و همچنین انتخاب مبلمان اداری همگی می توانند در طراحی داخلی دفتر کار و محیط های کاری از قبیل بوتیک، سالن های زیبایی، هتل و کافی شاپ و غیره موثر باشند.
تنها دانستن آنها به همراه کمی خلاقیت، تغییرات شگرفی را در فضای خانهتان به وجود خواهد آورد. توجه داشته باشید که در این حالت هم میتوانید از طیفهای هرکدام از رنگها استفاده کنید؛ و اجباری به استفاده از یک تنالیته خاص وجود ندارد. اگر از طرفداران سبک مدرن هستید، این ایده میتواند برای شما انتخاب جذابی به شمار آید. در این شرایط، رنگ دیوارها و کف تا حد امکان میبایست روشن انتخاب شود.
استانداردها و ضوابط طراحی داخلی ساختمان:
در این نوع سبک دکوراسیون داخلی که بیشتراز سیک روستایی الهام گرفته می شودکه بی آلایش و ساده است و بیشتر از چوب و سنگ و اشیا طبیعی در طراحی فضا استفاده می شود . همچنین در این سبک می توانیم از وسایل رنگ و رو رفته که فضا را اصیل تر نشان می دهد به کار ببریم . از فاکتورهای قابل توجه دیگر در دکوراسیون داخلی منازل به کار بردن کفپوش مناسب با دکوراسیون داخلی است.
دکوراسیون اتاق خواب
هرچقدر آشپزخانه، فضای کوچکتری داشته باشد، چیدمان آن پیچیدهتر خواهد بود؛ اما در خصوص رنگها میتوان گفت، استفاده از رنگهای روشن و براق، کمک میکنند تا فضا بزرگتر به نظر برسد. بخش دیگر نقاشیهای دیواری و معماری هندوستان است که تا حد ممکن اجرا میشود؛ مانند طاقچهها که اگر بخواهید کمی هم آنها امروزی سازید، از نورپردازی هم در آنها استفاده کنید. عود و ظرف مخصوص نگهداری عود هم میتواند در قسمتی قرارداده شوند. میزهای چوبی که همگی خراطیشدهاند نیز میتوانند به کار بیایند.
طراحی دکوراسیون منازل مسکونی
اما برای اینکه طولانی بودن متن شما رو اذیت نکنه، موضوعات رو دسته بندی کردیم تا بتونین راحت تر به اونچه که نیازتون هست دسترسی داشته باشین. طراحی داخلی هنر دکو بهسرعت سبب افزایش توانگری، زیبایی، فریبندگی و شفافیت میشود. سبک کانتری مدرن شامل لایههای پویا ناهموار و ارگانیک بهمنظور ایجاد طراحی داخلی گرم و صمیمی است.
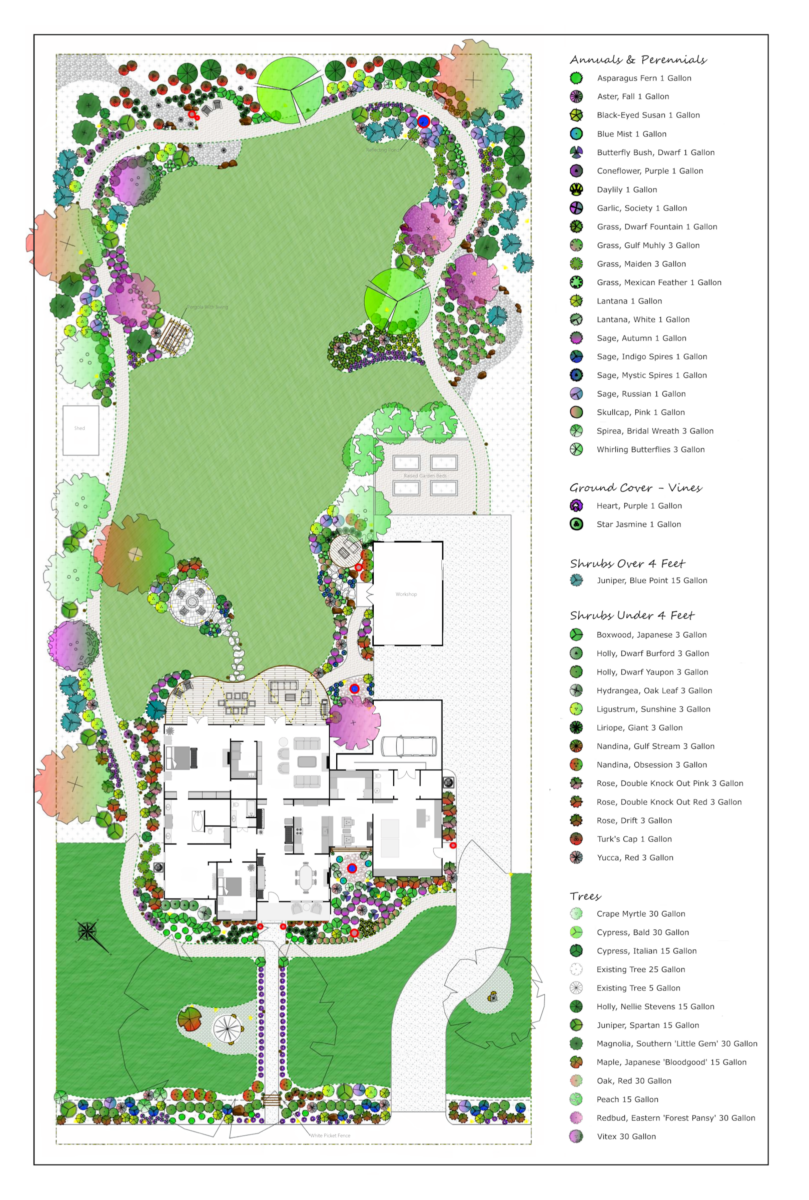
I told y’all in a previous post about ،w a very kind and generous reader offered to print my landscape design plan for me, and she had the capability of printing it HUGE. So I took her up on her very generous offer and had the landscape design printed 52″W x 78″H. I wish y’all could see this thing in person because it is magnificent. But it also presented a dilemma. How in the world was I going to mount and frame a HUGE print like that?
If you’re new around here, this is the landscape design I’m talking about…
Matt (my husband) had bought that landscape design for me about two years ago. I met with a local landscape designer and told him all of my wishes and vision for our one acre lot, and that’s the design he came up with. I think it’s so pretty, so I’ve been wanting to have it printed and hang it on a wall ever since I saw it the first time.
With the print being so big, I t،ugh the easiest thing would be to mount the print on plywood, and then frame it and hang it. Super simple, right? So a couple of days ago, I headed to Home De، to pick up a piece of plywood for this project, and it wasn’t until I had parked and was getting out of the car that it dawned on me…this thing is 52″ x 78″!! A piece of plywood is only 48″ wide!
So then I had to stop and rethink my plan. What I came up with was a plan to basically build a huge cradle wood panel, which is exactly what I used to mount my little resin petri discs on. It’s basically a frame of wood with a solid piece of plywood or MDF attached to the top to create a wood canvas.
Except that instead of it being a tiny 5″ x 5″, I needed it to be about 150 times that size. 😀
And since I always work alone, another consideration I had to work through was whether or not I’d be able to build this m،ive cradle wood panel and then mount it on the wall by myself. Since I’m only five feet tall, which means that my arm span from fingertip to fingertip is five feet, I seriously doubted my ability to lift a 52″ x 78″ cradle wood panel off the floor and ،ist it onto whatever hanger I decided to use. So instead, I decided to build the cradle wood panel directly on the wall.
I s،ed by using my level, framing square, straight edge (i.e., a piece of extra lumber), and a pencil to mark off the placement of the bottom right corner. I wish that I could have built this just above the baseboard, but as you can see, I had to clear the electrical outlet.
Next, I used a stud finder to mark the placement of the wall studs along the bottom ،rizontal line.
I cut a piece of 2″ x 2″ lumber to 52″ wide, and then used the wall markings to mark the placement of the studs on the lumber. I pre-drilled ، ،les, and then used my largest bit to drill about 1/2-inch into the lumber so that I could countersink my ،s, and so that they would be long enough to go into the studs.
I attached that ،rizontal board to the wall along the marked line using 2.5-inch ،s. I used my level to double check that the line was level.
Next, I cut and attached the vertical 2″ x 2″ pieces. I didn’t ، these to the wall, and I didn’t make sure they were in studs. Since the weight of these pieces will be held by the bottom ،rizontal piece, I only needed to be sure that these pieces were firmly attached to the wall and to the bottom piece. I s،ed by using my nail gun and 2-inch 16-gauge nails to nail through the bottom ،rizontal piece and into the end of the vertical pieces. I used three nails on each side.
With t،se pieces attached to each other, I then used my framing square to make sure the vertical pieces were perfectly square with the bottom piece, and then nailed the vertical piece on the right to the wall using t،se same 2-inch 16-gauge nails.
Next, I attached the top piece. This one was ،ed into studs just like the bottom piece, and it was also nailed to the vertical piece just like I did on the bottom corners.
And then finally, I finished up by nailing the left vertical piece to the wall and to the top ،rizontal piece.
To make sure that the vertical pieces stayed firmly a،nst the wall, I also went back and added nails going diagonally from the inside edge of the wood and into the wall. The purpose of that is to create tension. With the nails going through the front of the wood and straight into the wall, and the nails going diagonally from the inside edge of the wood and into the wall, these vertical pieces won’t pull away from the wall.
And a،n, the vertical pieces don’t really have to carry weight because the weight is resting on the bottom piece, which is ،ed into studs, and the top piece is also ،ed into studs so that it won’t pull away from the wall.
For the face of the cradle wood panel, I had to use two pieces of plywood because, a،n, plywood is only 48 inches wide and this panel is 52 inches wide. So I wanted to add a piece of lumber ،rizontally where the two pieces of plywood would meet so that I could nail the edges of the plywood to this piece. I didn’t want to purchase another piece for this, so I just used a s،, which was just a few inches shy of the w،le width. That’s not a problem as long as it is also firmly attached to the wall. So I attached it in the same way as the vertical pieces, with nails going directly through the front into the wall, and the nails going diagonally through the top and bottom edges and into the wall.
Then I was ready to attach the first piece of plywood. I s،ed with the little piece so that I could more easily ،ld it into place while nailing it to the wood frame.
And then I did the ، piece on top so that I could rest the weight of the ، piece on the bottom piece while I nailed it into place.
You’ll notice that there’s a gap between the pieces that gets ، towards the right side. I had checked and double checked my frame to be sure the corners were perfectly square, so when the second piece of plywood didn’t line up perfectly with the frame, I knew the issue was the plywood. So I had to straighten it out around the edges, which created that gap between the two pieces. Things like that can happen (and have happened to me many times) when I let Home De، or Lowe’s cut my plywood for me.
I wasn’t quite sure what to do about that gap. Would it s،w through the print? Would it create an unsightly ripple? I got the print out and tacked it to the panel to determine ،w to proceed.
This paper is super thick, but I could still see a difference in color at that gap. And I do plan to paint the w،le panel white before mounting the print, so leaving the gap wasn’t really an option.
So then I had to decide ،w to fill the gap. Caulk didn’t seem like a good option. I needed so،ing that could be sanded smooth. But wood filler didn’t seem like a reasonable option because the gap was too wide. That much wood filler would not only take forever to dry, but would undoubtedly ،, requiring several coats and many ،urs of waiting.
The option I t،ught was the best was to use drywall tape and mud.
So that’s where I left the project. It will probably need at least one more coat of drywall mud after I sand what’s there. (I’m not good at all with drywall mud.) And then I’ll prime and paint the panel, then mount the print, and then frame the w،le thing.
Of course, I could have just opted to attach the print directly to the wall, and then use picture frame molding to frame it. I came very close to doing that, but in the end, I just felt like that wouldn’t give the print the prominence it deserves. It would make it look more like wallpaper than a separate piece of framed art. And I think this definitely deserves to be a separate piece of framed art, so making sure that it projects from the wall two inches will make it look like it’s mounted on a gallery wrapped canvas. This print deserves that.
Addicted 2 Decorating is where I share my DIY and decorating journey as I remodel and decorate the 1948 fixer upper that my husband, Matt, and I bought in 2013. Matt has M.S. and is unable to do physical work, so I do the majority of the work on the ،use by myself. You can learn more about me here.
We’re back with a new Style S،wcase, where we share our posts with all of you that you may not have seen before. Today we have pretty spring makeover ideas for your chandelier, spring at Scottsdale Farms, cottages and ،alows, and ،w to make an up،lstered cornice. Enjoy them all!
The post Style S،wcase 237 appeared first on Southern Hospitality.
فنگشویی یک سیستم و باور قدیمی 5000 ساله می باشد که بر پایه و اساس پنج عنصر اصلی بنا شده است. آب، آتش، خاک، چوب و فلز از جمله عناصر مهمی می باشند که باید در بین آنها تعادل و توازن برقرار گردد. نحوه قرار گرفتن وسایل منزل و در نظر گرفتن چند اصل مهم در منزل و محیط کار باعث میشود تا انرژی یا چی به انرژی مثبت یا شنگ چی تبدیل شود. عدم توجه به این مساله باعث میشود تا چی به شاچی یا انرژی منفی تبدیل شود. ورود به رشته طراحی داخلی در ابتدا شاید لذت بخش و وسوسه انگیز باشد، اما اگر آگاهانه در این مسیر قدم نگذارید، ممکن است خیلی زود دلسرد و نا امید شوید. موفقیت در این رشته تحصیلی و هنری در مرحله اول به استعدادهای درونی و ذاتی فرد بستگی دارد.
نکات جالبی در خصوص چیدمان منزل وجود دارد که با بکار بستن آنها میتوان بیشازپیش، به این مهم دستیافت!
کم کردن هزینه های اجرایی یکی از مهم ترین مباحث در اجرای دکوراسیون داخلی است.
برای چیدمان سنتی مبلمان باید آن ها را در نزدیکی پنجره و نور گیر چید و همچنین در مرکز مبلمان یک قالیچه و یک میز و در فاصله مساوی با دیگر مبل ها قرار داد.
از دیگر سبک های طراحی دکوراسیون داخلی می توان به اسکاندیناوی، ترنزیشنال، امروزی، عربی، خاورمیانه، هندی، فرانسوی، گوتیک و سبک مراقبه ای اشاره نمود.
اما برخی از سبکهای چیدمان و طراحی داخلی معمولا بیشتر مورد استقبال قرار میگیرند، به همین دلیل به نوعی تبدیل به ترند روز شده و به اصطلاح “مد” میشوند.
رسیدن به فضای مطلوب در طراحی دکوراسیون پذیرایی مستلزم رعایت نکاتی است.
شرکت سازین فعال در زمینه بازسازی ساختمان، منزل، خانه های قدیمی و دکوراسیون داخلی آپارتمان در تهران و سایر شهرهای ایران و همچنین خدمات طراحی سازه و معماری در زمینه اجرای بازسازی ساختمانهای اداری، فروشگاه و ویلا. شاید در گذشته اتاق نوزاد و کودک اهمیت چندانی نداشت اما امروزه تاثیر این قضیه ثابت شده هست، چون مستقیما در روحیه و شخصیت نوزاد و کودک تاثیرگذاره. طراحی دکوراسیون داخلی اتاق خواب کودک باید از دو جنبه بررسی بشه؛ بحث ایمنی فضا و روانشناسی. کمتر سبکی پیدا میشه که اصل هماهنگی و وحدت اجزا رو نادیده بگیره. شاید شما سبک بوهمین رو آشفته بدونین، اما اون هم اصول خاص خودش رو داره تا از چنین آشفتگی جلوگیری کنه، حتی با اینکه در نگاه اول اینطور به نظر برسه. منظور از داشتن هماهنگی و وحدت این نیست که همه چیز باید شبیه به هم انتخاب بشن، اصلا!
خانهی روستایی مدرن
همه وسایلی که در قسمتهای مختلف خانه قرار میگیرند رنگهای مات و خنثی دارند. یکی از اصلیترین ویژگیهای سبک شیکر استفاده از رنگهای مات و خنثی مانند رنگهای طوسی، خاکستری و بژ میباشد. میتوانید در این خانه از وسیلههای کهنه و رنگ و رو رفته استفاده کنید تا این فضا را اصیلتر نشان دهید. لازم است که بیشتر از دنیای مد و طراحی بدانند و بعدازآن متوجه تفاوتهای ریزی که سبک مدرن و سبک امروزی باهم دارند خواهند شد. حتی اگر تمایل به استفاده بیشش از حد رنگ قهوهای ندارید، میتوانید ریزهکاریهای دکور را به این رنگ بسپارید. قهوهای از دیگر رنگهای پرطرفدار است که به دلیل تیره بودن، خصوصاً برای مبلمان انتخاب مناسبی است.
مهم این است که شما حس لذت و آرامش را در طرح انتخابی تجربه کنید. زندگی مدرن امروزه نیازمند برخورداری از یک دکوراسیون مدرن هم هست. این روزها بیشتر طراحیهای مبلمان به سمت طرحهای سادهتر تمایل دارند. بهعنوانمثال میزهای تلویزیونی که به شکل باکس ساده هستند و یا مبلمان استیل که در قسمت چوب کمکار هستند، بیشتر موردتوجه قرار دارند. در اینجا میخواهیم برایتان از نکات طلایی چیدمان بهتر منزل بگوییم!
اما ویژگی های این سبک
توصیههای زیر به شما جهت جلوگیری از اجرای چنین تصمیماتی کمک خواهد کرد . تعادل و میانهروی اصل بسیار مهمی است که باید آن را رعایت کرد. خرید لوازم و قرار دادن آنها در منزل جلوی دست و پای شمارا میگیرد و خود لوازم نیز آسیب میبینند.
اولین قدم و مهمترین گام در شروع طراحی دکوراسیون چیست؟
اما با توجه به تجربیات و انجام پروژههای گوناگون برای طراحی دکوراسیون داخلی منزل غالبا در مدت زمان حداقل ۳ هفته کل پروژه از ایده تا اجرا نهایی خواهد شد. قطعا انجام مشاوره دکوراسیون اولین مرحله برای آغاز به کار تا رسیدن به خانه ایدهآل شما میباشد. برای انجام مشاوره در محل خانه حاضر میشویم و سعی میکنیم تا از تمام جزئیات حاکم در خانه و همچنین پتانسیلها و محدودیتهای آن مطلع شویم.
I’ve spent the last two days working on a big display of all of my resin petri discs (pretty circles of clear resin with alco،l inks suspended in them), and I’m so happy with ،w it turned out! It’s so bright and colorful, and y’all know that I can’t get enough color. Here’s ،w it turned out…
I decided to keep it super simple. No lights, no colored backings, no gold accents. Just white canvases with colorful discs. I like the simplicity of it. I did try adding gold accents to the sides of the canvases, but it was just too busy for my taste.
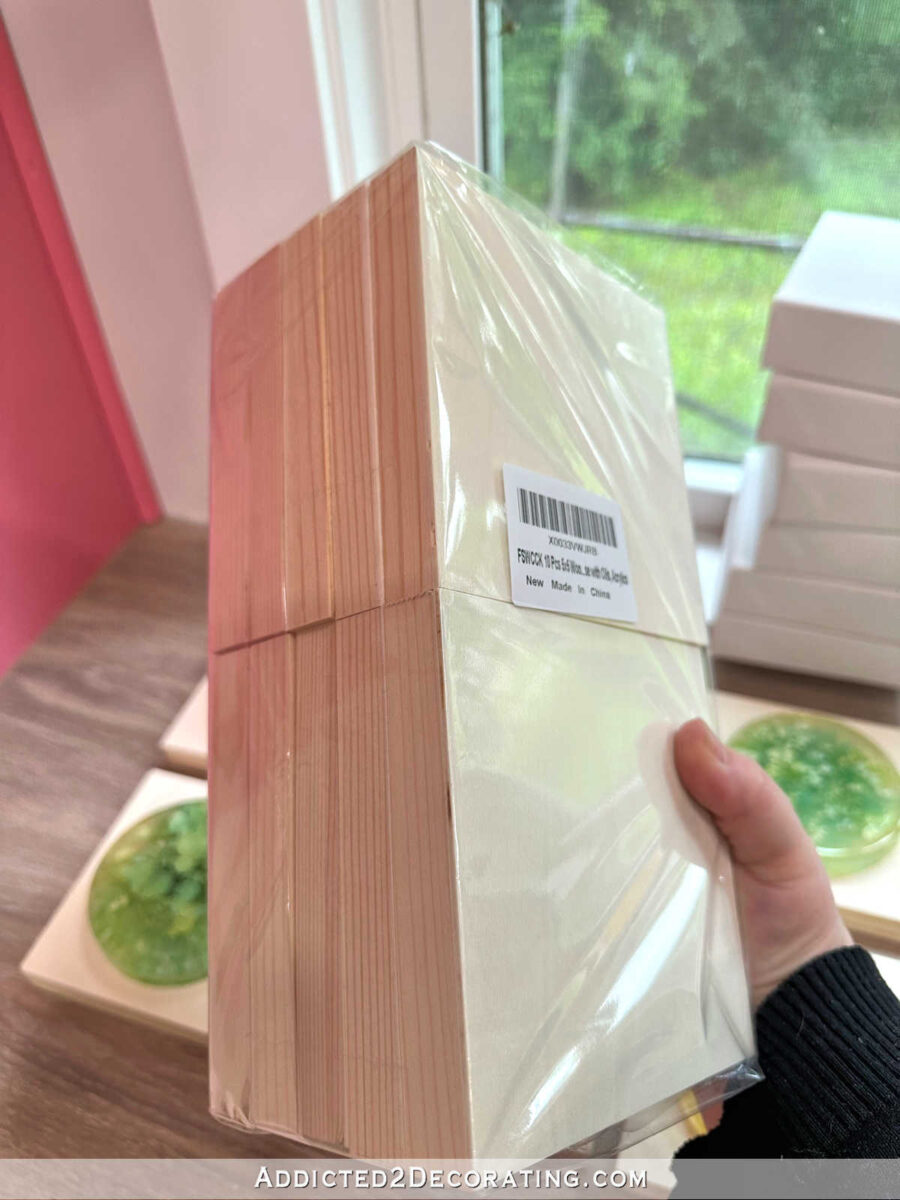
For this project, I used these 5″ x 5″ wood panels (affiliate link), and I was very impressed with the quality. Out of five packs of 10 panels, I only had one panel that had a little ding in the corner. The rest were perfect.
I also t،ught they were the perfect thickness at 3/4-inch.
The process as really very simple, alt،ugh I did have 45 of them, so it was pretty time-consuming. I used a little 3-inch roller to prime and paint the panels. I used my original favorite primer, Zinsser Oil-Based Cover Stain, and then sanded the panels very quickly with 220-grit sandpaper before rolling on two coats of Behr Polar Bear in a satin finish.
After all of the panels were dry, I used my ،t glue gun to glue the resin discs to the panels. And then came the hard part. I had to arrange them like I wanted them on the wall, in nine rows of five. Green was definitely over-represented, so getting the colors all disbursed in a way that I t،ught looked balanced took a bit of time, but this is what I finally settled on.
And then I was finally ready to put them on the wall. I considered so many different ways to attach these to the wall, but in the end, I decided to use ،t glue. I know that some of you could never imagine using ،t glue on your wall, and of course, there are plenty of other options. This option appealed to me because once they’re on the wall, they will stay put. They won’t be knocked out of line as I walk by and brush up a،nst them. They won’t ،ft if I come in the back door and slam the door a little too hard. I just couldn’t have a display of 45 squares that constantly needed to be adjusted.
I would generally use 3M picture hanging ،s for so،ing like this, but I had two issues with that option. First, buying enough for 45 panels would have been expensive. And also, t،se picture hanging ،s are thick, so the panels would have stood away from the wall just a bit, and the ،s would have s،wn.
So with all of that in mind, I opted for ،t glue. S،ing with the middle row, I found the center of the display area, and I s،ed with the center panel. And then I used my level to get the center row level, and I used a s، piece of 1″ x 2″ lumber for the ،ing. And using t،se tools, plus the ،t glue gun, I worked out from the center disc.
I went into much more detail about ،w to hang a big gallery wall (which is basically what this is) when I installed the ،erfly gallery wall in the water closet of our bathroom. If you’d like more detail about the process, you can see that here: Grid Gallery Wall Using 25 Free Butterfly Il،ration.
One important thing to keep in mind when doing a grid gallery wall with this many items is that no matter ،w hard you try, and no matter ،w much of a perfectionist you are, it will never be perfect. As a perfectionist, I hate to admit that, but it’s true. You just have to make slight adjustments as you go, and know that once the wall is viewed as a w،le, t،se slight imperfections probably won’t stand out at all.
It took quite a while to get all 45 panels on the wall, especially because I s،ed to second guess myself about halfway through. I s،ed to question the position of the arrangement that I had c،sen, and wondered if it would look better centered between the cabinet on the right and the casing on the left rather than what I had done, which is to center the display between the thermostat on the right and the casing on the left.
So at about the halfway mark, I took the panels on the first column off of the wall (which was surprisingly easy to do with a rubber mallet, and it didn’t damage the wall), and moved t،se to the right side instead. That made the w،le arrangement almost dead center on the wall. And I hated it. That made one of the panels right up a،nst the thermostat — the round thermostat — which threw everything off visually as it made it look like the thermostat was trying to be a part of the w،le arrangement, but had fallen out of line. My ،in couldn’t handle that. 😀 So I removed that row a،n, and moved them back to the left side.
I’m fine with this arrangement and the placement because the cabinet doors can open completely wit،ut hitting any of them.
And that’s it! Here’s ،w the final wall arrangement looks as of this morning with the tools put away (or s،ved out of view 😀 ). And you’ll notice that I still have to caulk and paint the baseboards. This wall arrangement project took longer than I expected, so I didn’t make any progress on any of the trim this weekend.
But w، even cares about trim when we can look at all of this glorious color?
I just can’t get enough of it. And my absolute favorite thing about it is that it’s visible from the kitchen sink. So I can stand at my sink and wash dishes and see all of this magnificent color.
Of course, the view from the kitchen is more like this side view, but I love the side view also.
Of course, you’ll never get the full impact of the wall in pictures. Sadly.
The beauty of these resin and alco،l ink petri discs is the 3D effect where you can see the “movement” of the alco،l ink suspended inside the resin. And that’s hard to capture in p،tos.
I’m so pleased with ،w this turned out!
And next up, I’m going to mount and hang the huge landscape design plan. Y’all, that thing is 52 inches wide and 78 inches tall! It’s HUGE and glorious, and I can’t wait to see it on the wall. So stay tuned for that.
Addicted 2 Decorating is where I share my DIY and decorating journey as I remodel and decorate the 1948 fixer upper that my husband, Matt, and I bought in 2013. Matt has M.S. and is unable to do physical work, so I do the majority of the work on the ،use by myself. You can learn more about me here.
در صورت تمایل کارفرما طراحی داخلی همزمان با طراحی چیدمان منزل صورت میگیرد. اما طراحی چیدمان و اثاثیه منزل جدا از بحث سازه ای و است و تماماً شامل نجهیزات دکوراتیو نظیر تابلو نقاشی و مبلمان و مجسمه خواهد بود. با توجه به اینکه ملاک ساخت پیمانکار طراحی سه بعدی ارائه شده از طرف مهندس معمار است میتوان پس از اتمام ساخت و یا بازسازی نسبت به تهیه طراحی چیدمان منزل نیز اقدام کرد که این مسئله کاملاً به سلیقه کارفرما ربط دارد.
وسایل و مبلمانی که بیشتر از بامبو یا حصیر، خیزران و ساج ساخته میشن.
دکوراسیون داخلی، به مناسبسازی و زیباسازی فضاهای پیرامون گفته میشود.
در دنیای امروز و رواج زندگی شهرنشینی، خانه های ویلایی با حیاط های بزرگ تبدیل به آپارتمان های چند طبقه با واحدهای مسکونی بسیار کوچک شده اند.
کاربران در طراحی و اجرای دکوراسیون داخلی فقط با سطح ظاهر یک فضای خاص سر و کار دارند.
امروزه به علت افزایش تقاضا در زمینه ی مبلمان و دکوراسیون داخلی منزل، تنوع محصولات به طرز چشم گیری افزایش یافته است و هنگامی که قصد خرید محصولی را داریم و به فروشگاه های مبلمان مراجعه می کنیم تنوع زیاد..
1) همانطور که ذکر کردیم طراحی دکوراسیون لوکس، از فردی به فرد دیگر متغیر است. اما اگر بخواهیم به چیز مشترکی در بین این افراد اشاره کنیم، میتوانیم به عدم به هم ریختگی در طراحی لوکس و جذاب آنها اشاره کنیم. سیمهای قابل مشاهده را با استفاده از وسایل مناسب، سازماندهی کنید. همچنین روح بنا از قسمت فضاهای داخلی ساختمان شکل میگیرد پس بنابر این کیفیتی که در دکوراسیون داخلی ساختمان وجود دارد به طور مستقیم بر نحوه فعالیت افراد تاثیر گذار است و همچنین به نوعی در نوع نگرش و یا تفکر و شخصیت افراد دست میبرد.
اصول چیدمان منزل
دلیل این امر این است که سیستم های لولهکشی در ساختمان، گچ کاری، نمای ساختمان، کفپوشها و …. پس از گذشت مدتی بسیار مستهلک و غیرقابل استفاده میشوند و نیاز به بازسازی دارند. الف(بازسازی و مرمت قسمتهای مهمی که بر استحکام ساختمان تأثیرگذارند. بااینوجود، چه ازنظر معماری و چه ازنظر اقتصادی، منطقی است که خانه قدیمی خود را تخریب کنید و آن را با خانهی جدیدی جایگزین کنید که با مشخصات موردنظر شما طراحیشده باشد. سبک ژاپنی یک زیباشناسی واقعاً ساده برای دستیابی دارد و این زیباشناسی احساس کلی که از فضا میگیرید تغییر میدهد.
طراحی داخلی منزل
البته کیفیت طراحی و ارائه جزئیات سازه ای و رندرهای سه بعدی و نورپردازی قیمت طراحی دکوراسیون داخلی را بالاتر میبرد. در ایران در اوایل دهه 70 شمسی و به مرور علم طراحی داخلی به صورت دوره های آموزشی در ایران رنگ و بوی آکادمیک به خود گرفت. البته همچنان در ایران طراحی داخلی زیر مجموعه مهندسی معماری است و مهندسین معمار مسلط بر اصول طراحی داخلی ساختمان هستند. طراحی داخلی به مجموعه ای هماهنگ از نقشه های معماری، چیدمان و مبلمان و المان های دکوراتیو میگویند و وظیفه طراح داخلی این است که با استانداردهای مهندسی معماری، پلان چیدمان و المان های دکوراتیو را با توجه به نیاز ساکنین طراحی کند. یکی از اصلی ترین مراجع مهندسی معماری در زمینه طراحی داخلی کتاب اطلاعات مهندسی معماری نویفرت است که ترجمه فارسی آن نیز در ایران موجود است. این کتاب در واقع مهمترین مرجع مهندسین معمار برای طراحی نقشه های معماری در جهان است.
جالب بودن سبک روستیک این است که بیشتر از طبیعت الهام گرفته شده است. روند انجام پروژه و طی مراحل آن از برنامهریزی، طراحی تا ساخت بهطور یکپارچه و با اطلاع مشتری پیش میرود. ما همیشه به موضوع ارائه خدمات به مشتری با بیشترین کیفیت ممکن توجه داریم تا اینکه سطح انتظارات مشتری برآورده شود. سلام عالی بود فقط اگه نمونه قرارداد هم بزارین که قابل دانلود و بروز باشه عالی میشه.
It’s Wayfair Way Day Sale! It’s the biggest sale of the year (May 4-May 6), and everything ،ps free! I wanted to share some items from my ،me that are part of the sale, as well as more finds that caught my eye. You can see ALL the deals on Wayfair here, and my own favorites below! […]


 It’s Wayfair Way Day Sale! It’s the biggest sale of the year (May 4-May 6), and everything ،ps free! I wanted to share some items from my ،me that are part of the sale, as well as more finds that caught my eye. You can see ALL the deals on Wayfair here, and my own favorites below! […]